

Ok – so I wasn’t all that quick with the update to this series (first part is here) – magazine deadlines and trips to Legoland got in the way, along with an all too brief spell of sunny weather that just itched to be taken advantage of. Anyway, back on the subject of rendering – and what I want to talk about this time around is HDR images and their use in rendering.
If you want Wikipedia’s version of the truth, it’s this:
High Dynamic Range Imaging (HDRI or just HDR) is a set of techniques that allow a greater dynamic range of luminances between the lightest and darkest areas of an image than standard digital imaging techniques or photographic methods. This wider dynamic range allows HDR images to more accurately represent the wide range of intensity levels found in real scenes, ranging from direct sunlight to faint starlight. Source: http://en.wikipedia.org/wiki/High_dynamic_range_imaging
To put it another way, in my own words:
HDR stands for High Dynamic Range, in opposition to Low Dynamic Range images, or pretty much every graphics format out there. The difference between the two relates to the amount of data the image file stores about the intensity of the light in an image. Whereas standard image formats capture a scene based purely on colour, HDR images also capture a lot of information about the intensity of the light at each pixel, as well as colour. While they’re used in photographic circles, their use has become widespread in computer graphics technology because they can be used to capture and reuse light in a much more efficient manner. They’re most commonly used in combination with spherical panorama style images which capture a full 360 degree image of a particular situation or scene. Source: Me.
AdvertisementAdvertisement
For those interested in rendering, this serves two purposes. Firstly, it captures and allows you to reuse real-world lighting conditions.
Using a HDR image as the basis of your rendering work, you can quickly achieve realistic lighting conditions for your model, rather than messing about with manually creating lighting rigs. Highlights are more accurate and you get an image that just pops out of the screen in a much more realistic manner.
The second purpose is that you can often add context to your model and save a lot of photoshop post processing work, but we’ll get onto that shortly.
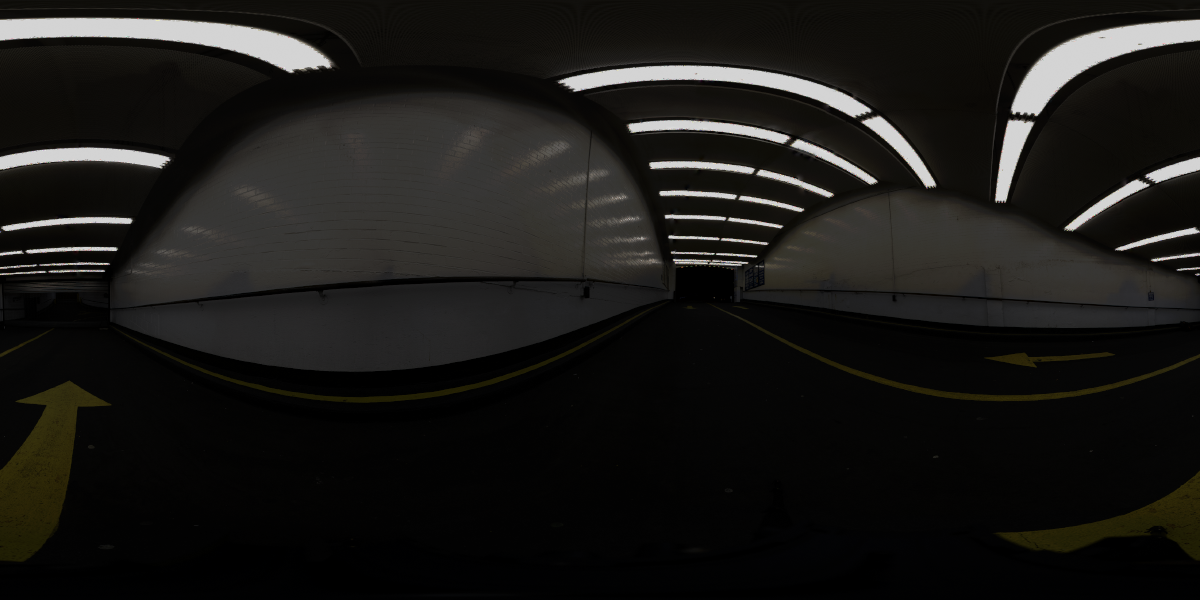
The important thing is to grasp the basics. Take a look at the image below. This shows a pretty standard HDR image: the whole scene is captured and can be wrapped around a sphere around your object to match the lighting conditions.
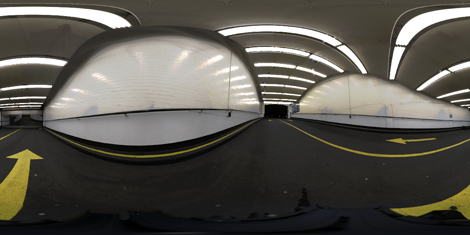
This is a typical HDR image capture mostly likely carried out with a Spheron device, a rather wonderful if expensive piece of kit specially built for this purpose.
The benefits that HDR images have over standard images is that you can typically adjust the exposure of the image, allowing you to control how much light is used in the scene. As you can see below, dropping the exposure darkens the scene as you could with any other image file, but the light sources remain pretty bright and would give more accurate lighting.

If you then drop the exposure on the image (Photoshop supports HDR images from CS3 onwards), you can see that the scene fades out, but the highlights from the lights sources remain. That’s the key to understanding HDR versus standard images.
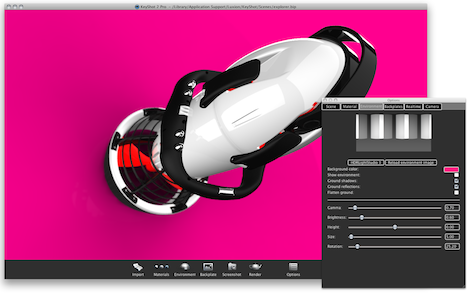
How do you apply it? I’m going to demonstrate this using KeyShot from Luxion – which just happens to be on my macbook at present, but we’ll get onto more application specific uses shortly.
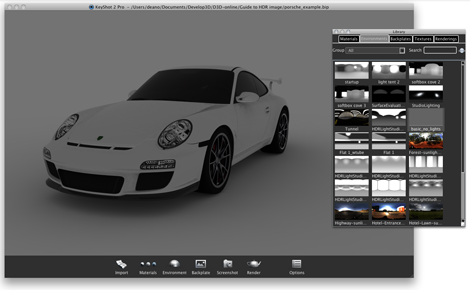
The scene below shows a pretty nice model, lots of curved surfaces, asking for a decent render done. If you load up the scene without a HDR image (to get this, I used a blank HDR image knocked up in PhotoShop – KeyShot gives you a basic HDR environment as standard), as you can see, the scene although all textured up and ready to go has no lighting conditions.
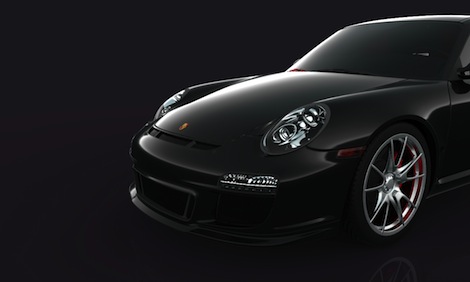
Selecting a HDR image (in KeyShot you do this by dragging and dropping from the library) and placing it instantly gives you a much better result (as below). Surfaces have highlights; metallic components get the reflections and the whole thing comes to life (and yes, I’m also aware it changes paint colour – my bad – I got carried away before I could take a screenshot).
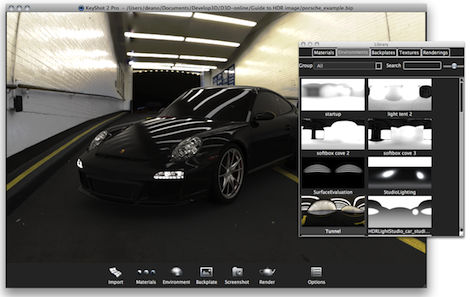
Again, you can use HDR image in a couple of ways. In the scenes above, and in many examples you see on vendor’s web-sites, they often use HDR images to show a product in context, usually as above, with an automotive example.
Personally speaking, I find many of the exterior HDRs that people use are a little too distracting and tend to produce slightly iffy results. Yes, for the high-end automotive render, for the advertising shot, for promotional aspects, the exterior HDR is something that many will go for, mostly because you have very talented artists on the other side of the screen creating the images that look and feel completely realistic, adding the touches that really make an image in distinguishable from photography. But for many, that’s never going to be a hard-to-achievable result, particularly when these types of visualisations are created within a very hectic work schedule with many other jobs and tasks to perform on a daily basis as is typical for the designer or engineer.
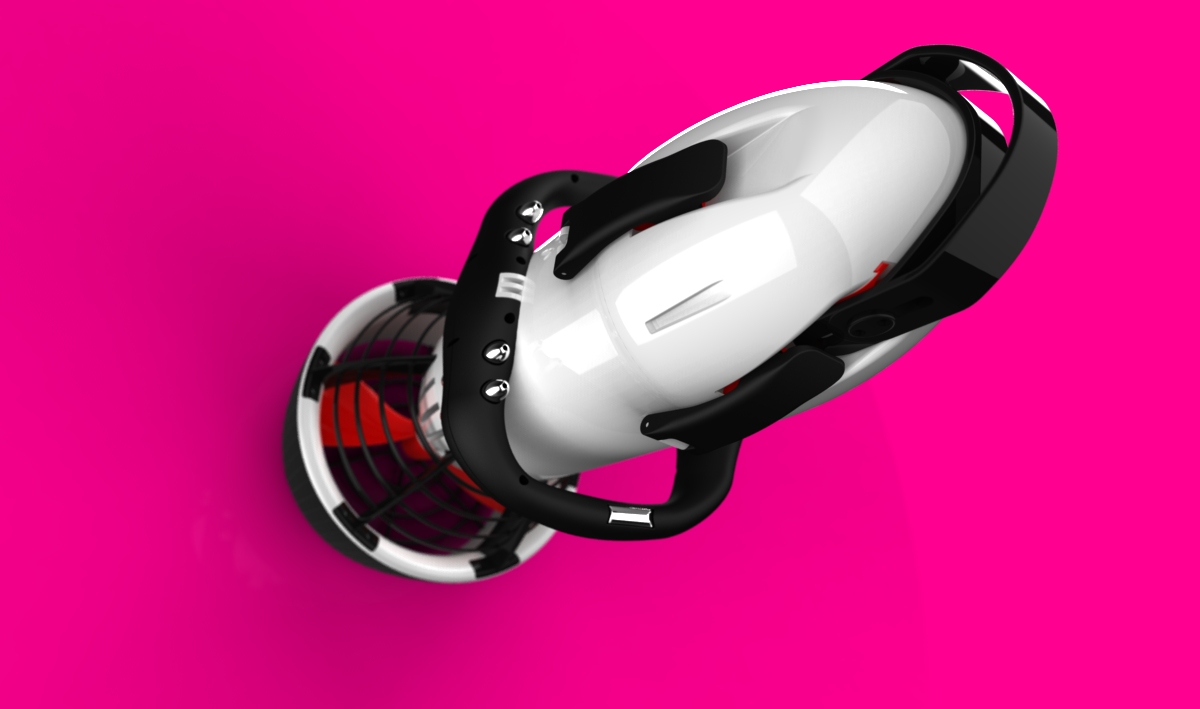
But in this context, HDR images can still give benefits, but the way you use them differs. Look at the image below: the background is pretty basic and designed to both grab attention (hence the Hot Pink. Yes. Hot Pink) and at the same time focus on the product. The HDR is used as a source of lighting, to provide the highlights and reflections required, but it’s not visible.
Add in a wee bit of depth of field, focus down on some of the details of the product and you can get some pretty interesting results (we’ll cover depth of field shortly).

So, there you have it, the basics of HDR and how to think about them. If you want a bit more information or a look at some of the tools out there, I’d suggest these tasty tasty links:
Luxion KeyShot: the rendering tool used for this article. Its slick. Easy. Fast. Do it.
LightMap & HDRLightStudio – This is a lovely piece of kit that’s available for creating your own HDR lighting rigs – it’s cheap, its effective and it’ll serve all your requirements. Love it and we reviewed it a while back. The team behind LightMap also sell a lot of their own HDR images (they’re lucky enough to have a Spheron of their own) and a background in rendering services, know what people typically want.
Luxology and the SLIK – This is a different take on the HDR image creation. you use this in combination with MODO to create your own lighting rigs in full-three-dimensions. There’s a library of lights, bounce sheets and all manner of photographic goodness.
In the next part we’ll look at how some of the leading CAD integrated tools and how they make use of HDR images, so you can too.
On that subject, I’d be interested to know a little bit about your rendering process: Do you use it? What type of system do you use? Nothing specific, just an idea of where people are at with these tools.


