
Rendering. It’s a wonderful thing. The ability to take a digital model of a product that doesn’t exist, create a photorealistic image of it to show, in exact detail, exactly how it’s going to look if and when you manufacture it, is a wonderful thing. But creating those images is a royal pain in the backside. Take a look at the rendering tools integrated into any 3D product development system and you’ll find something based on a half decent rendering engine (or in some cases, a clunky old one), but the workflow, the sheer effort required to apply materials, to create textures and lighting conditions, doesn’t make for an enjoyable experience. Preset materials are rubbish, the lighting set-ups are unrealistic and the results are pretty woeful unless you invest a hell of a lot of time getting to know the ins and outs.

PhotoView 360 is a standalone application, licensed alongside SolidWorks, that brings progressive rendering, HDR based lighting and scene set-up to the SolidWorks community. It removes many of the bottlenecks associated with creating photorealistic images
A prime example of this is PhotoWorks, which has been part of SolidWorks for the past decade. It’s been through some changes (dropping LightWorks in favour of Mental Ray a few years back), the workflow has changed pretty consistently, but still it’s a pain to use. Yes, there are experts out there that use the system. With talent, you can achieve great things.
But when deadlines are looming, pressure is on and you need to create a decent image, do you have time to mess around? One advisor to our magazines put it nicely in an email: “I don’t get paid any extra to do rendering work, my boss just expects it.” With this in mind, SolidWorks has released PhotoView 360. I put it through its paces.
With drag and drop materials and environments, the system gets you closer to realism with minimal hassle and the progressive rendering means that you can see the effect of edits immediately – so you can make decisions without having to wait
PhotoView 360 is based on the Nexus rendering engine from Luxology, the team behind the sub-divisional modeller, Modo. Nexus is a progressive renderer. What that means is that the system streams the rendering into the display, so you start with a basic pixelated view, and things refine with each pass. If you leave the model alone (not changing materials, view and so on), then you’ll eventually end up with a pretty nice rendering without doing much. The speed with which that happens depends entirely on your hardware set-up. But the key point is that as you play with views, material and environment set-ups, you get a good idea of what you’re working on, getting closer to the ideal than using traditional rendering tools.
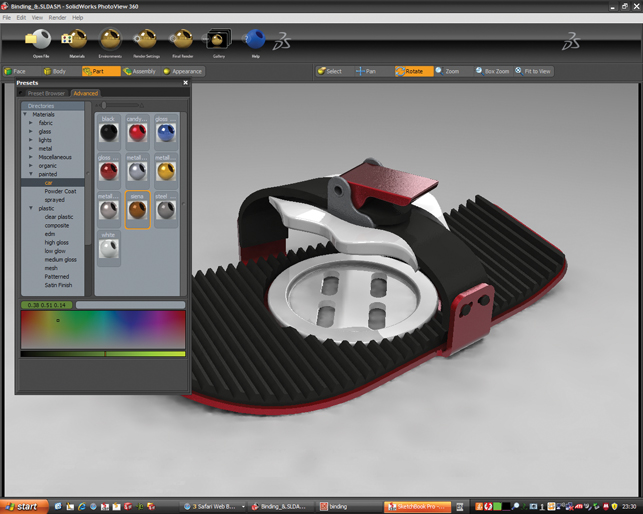
But how do you set-up those renders? PhotoView 360 is a standalone application that installs alongside SolidWorks. It reads in SolidWorks parts and assemblies directly, and picks up a couple of things from the state you saved the model in when you last accessed it, such as the active configuration and the last view setting. But perhaps most critically in terms of workflow, it also picks up the RealView settings. RealView is the name given to the hardware-based shaders that SolidWorks incorporated in the last few releases to present models in a more realistic manner and to provide a range of different background environments for the models you’re working on. PhotoView 360 picks up on these and the materials/textures are matched to those in SolidWorks. So the model appears in PhotoView much as it would in SolidWorks with RealView switched on. With the progressive rendering, the photorealism starts to filter through and within seconds you get a pretty good image.
When deadlines are looming, pressure is on and you need to create a decent image, do you have time to mess around?
Alongside the environments, PhotoView also includes a matched range of materials/textures that can be applied to the model, plus some extras. The system has an interesting workflow in that you open up the materials library, find the material you want, then drag and drop it onto the geometry you want to apply it to. There’s an interesting filter in the UI, so that you can pre-select what you want to apply the material to – face, body, part or assembly. There’s no feedback as such, but the display will re-pixelate then stream in the higher quality image. When you apply to instances of a part, all of the instances have the same material applied – handy for assigning materials to fasteners and such.
One of the biggest pains for any rendering system is the set-up of lights, but the recent adoption of HDR based lighting across the CGI industry has reduced the timescales and difficulty associated with lighting set-up. Because these files contain both scene set-up and high quality lighting information in a single file, the set-up process is incredibly quick – you pick the environment you want your product in (and there’s a healthy range to choose from) and you’re done.
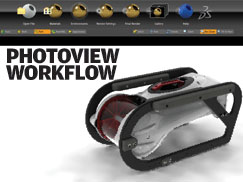
Click here for an exclusive Develop3D PhotoView 360 Workflow
When you’ve got your render set-up, you have to go through the process of calculating it to achieve your final image output. The settings are pretty self-explanatory and you can get the image format and resolution you need in a short space of time. One thing that’s clear is that the rendering engine in use here is pretty efficient and gets you that final rendered output in a very short space of time, particularly when you compare it with rendering systems of old. The good news is that because of the preview functionality, you’re pretty sure that when you do hit that ‘final render’ icon, the image that you have to wait for is the one you want.
In conclusion
PhotoView 360 is on its first release and it shows. You can’t select preset views as you might have in SolidWorks, can’t access those camera views you might have set-up, you can’t save views and, perhaps most annoyingly, you can’t snap the model to the floor of the rendering environment automatically – models are brought in just above the floor. Which makes very little sense, unless you’re working on jetpacks or other levitating devices.
But alongside these functional criticisms, there’s one thing that anyone who’s read DEVELOP3D over the past few months might pick up on – PhotoView 360’s similarity to HyperShot from Bunkspeed. I’ve made no bones about it; I love HyperShot. It’s clean, efficient and creates killer results. From what I can see, PhotoView is pretty much a straight copy of the HyperShot workflow – I can’t comment on the technology underneath and its origins (I’m not too sure which predate which), but it appears pretty similar. And when you have one thing mimicking another, you often find that it’s the fine details, the smaller points that get missed – and it’s those smaller points that can make the difference between ‘okay’ and ‘fantastic’. PhotoView doesn’t have some of the finer points. The view controls are a match for SolidWorks, but when you’re trying to create killer rendering, you need different controls. How you rotate the view around a model is critical – and the SolidWorks view method doesn’t cut it. There’s a sticking point here.
There’s also the question of licensing. PhotoView is aimed at people that don’t have the time to learn the intricacies of PhotoWorks, but need to create high quality images – according to our research, that’s an increasingly large number of users across a huge spectrum of industry sectors. Essentially, it’s applicable to almost everyone involved in product development. But to use it, you need to have a bundle of SolidWorks that includes PhotoWorks. In terms of current bundles, that’s SolidWorks Professional and Premium, as well older bundles such as SolidWorks Office or standalone PhotoWorks licenses.
Another question this raises is how does PhotoView 360 fit into the rest of SolidWorks? PhotoWorks has been there for many years and is directly integrated into the animation/simulation tools, so is it going to be replaced?
Not until the Nexus engine gets built directly into SolidWorks, and that’s going to take some work – but is it worthwhile? Yes, the set-up times are very quick, and reusing your material assignments makes much more sense. I guess the question is what do the majority want? A fully featured rendering/animation system, or just the ability to quickly create a static image? Our research indicates that static images are still by far the biggest requirement for rendering out. So perhaps PhotoView 360 is best left as standalone.
It’s quick, clean and for a first release, impressive, but it still needs work to make it a great tool that achieves ultra impressive results. I’m sure it’ll become more integrated into core SolidWorks, working in concert with the animation tools already there. I just hope it retains that cleanliness and streamlined workflow and doesn’t get bogged down as PhotoWorks inevitably did.
At a glance: PhotoView 36
Based on Nexus rendering engine from Luxology, developers of Modo.
SolidWorks integrated but standalone.
Reads RealView visualisation settings from SolidWorks parts and assemblies and reuses it as the basis for present real-time rendering.
Uses progressive rendering to provide high quality previews of renders before you calculate – can’t save out instant snapshots though.
Supplied with a range of materials and environments which both match the existing SolidWorks presets and extend them.
Uses HDR images for both scene set-up and lighting – reducing bottlenecks in rendering workflow.
Doesn’t have a customisable library of materials and doesn’t save changes back to the source SolidWorks data.
Can’t access different configurations and view set-ups from the source SolidWorks data.
Standalone yet tied to legacy PhotoWorks licensing – standalone purchase option could be useful for visualisation specialists.
| Product | PhotoView 360 |
|---|---|
| Company name | SolidWorks |
| Price | See text |
