Rendering. I think it’s pretty much accepted that more designers and engineers do it now than ever before. Whether through tools integrated into their workhorse 3D design systems or using standalone, special purpose tools — it’s a common part of everyone’s workflows and project task lists.
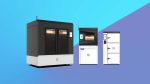
Fig.1 KeyShot 5 sees an overhaul of the user interface to bring commonly used commands to the fore and open up the system’s various options and commands (HDRI environment and back-plate from hdrmaps.com)
One of the leading exponents of the standalone crowd is KeyShot. Developed by Luxion, it’s a progressive renderer, meaning you get the visuals streamed to your screen, rather than waiting for a full test render to finish.
It’s clean, it’s lean and it has found its way into many users’ toolkits. With KeyShot 5, the team behind the product has stepped back and given the user interface a refresh, added in a bunch of new tools to advance the state of the art — as you’d expect from a major release.
With that in mind, let’s step through how the system works (for the benefit of those that haven’t used the system) then look at what’s been added, changed and enhanced.
As a lot of work has been done on how the user interface is laid out, let’s look at KeyShot from first principles. The user interface is clean, which is a rarity in standalone rendering systems. The majority is devoted to the model viewing area.
As experienced users will know, there’s a strip of icons along the bottom of the screen that bring up various panels or task specific dialogs. These follow the workflow required to set-up a model, so let’s follow them.
Import
File import is something that KeyShot has nailed down either through third party data translators or direct integration of CAD vendor’s libraries.
The import option allows you to bring in data from a variety of native CAD systems. These include Alias, Catia, Inventor, Maya, Creo, Pro/Engineer, Solid Edge, SolidWorks, Unigraphics/NX and AutoCAD. Both parts and assemblies are supported and you can import more than one set of geometry to build up your scene.
Non-native or standards-based formats also have a good level of support, including the usual suspects of STEP, IGES, Parasolid and ACIS, as well as STL, Collada, FBX and several more.
The import process provides a handful of options depending on what you want to do. These include the ability to have the geometry centred in the environment, snapping the model to the ground plane, scaling as well as handling mismatches between orientation of different CAD systems’ co-ordinate systems (relating to which axis is considered in the ‘up’ direction).
Also worth considering is LiveLinking introduced in the KeyShot 4 release. This works with a specific set of data import options (currently, Creo, SolidWorks, Rhino and most recently, Solid Edge and Autodesk Fusion 360) where a plug-in is installed into the host CAD system and data ‘pushed’ to KeyShot.
This establishes a link between the CAD data and the KeyShot session, allowing you to either push local updates, where specific parts have changed, or wholesale updates and have the system retain the material and texture set-up you’ve already worked on.
While the other options don’t have this capability, it’s worth exploring the tools available to work around this.
Once you have the data loaded into KeyShot, you can kick off another Import session and use the ‘update geometry’ option. This will look for part names that match and swap out the geometry, retaining materials as well.
There are then tools to assist with repositioning the geometry, scaling it and ensuring that the units match. While this isn’t key for some projects, once you get into using physically accurate light set-ups, it will become more so.
With KeyShot 5 there’s also been some work done on NURBS-based rendering, which is worth looking at.
Tesellation & NURBS
To date, KeyShot has relied on the tesellation (conversion of nice clean surfaces into a polygon mesh) to get the data into the system and to base the rendering process on. With KeyShot 5, there is now the option to import and, more importantly, use the NURBS data from 3D CAD geometry.
While the import options (even as default) do a pretty good job of importing to the right settings, it’s often the case that with large scale, complex assemblies, the global, overall nature of that tessellation means that smaller components might be somewhat faceted. That, is the nature of the beast.
Figure 2 shows a small detail area in a large model that, at full zoom, looks and renders nicely. But zooming into the details, the tesselation starts to show, particularly on round or highly curved features.
Fig. 1 & 2 The new NURBS-based rendering allows users to overcome issues with smaller details in tessellated models
When it comes to product detail shots, to show off smaller features in a large assembly (in terms of scale, rather than number of parts), this would typically mean reimporting the geometry again at a higher rate of tessellation — often just to get those details rendered nicely.
With KeyShot 5, on import, it’s possible to have the system keep the NURBS geometry as part of the native BIP file and switch to NURBS rendering. As seen in Figure 3, this cleans up those polygons and provides a nice smooth rendered surface — all from the same model. As ever, there’s a trade off here.
Rendering from NURBS takes longer — much longer (three times as much for this image alone) and the BIP file is much larger. Though, with today’s storage technology, that’s not as much of an issue as it once was.
The NURBS toggle is also holistic. This means that while you can toggle between mesh and NURBS rendering, it switches out the whole scene to render off the NURBS.
According to the Luxion folks, this is a first release, so I’d expect that the ability to switch specific components to NURBS might come in a point release over the coming months (don’t hold me to that though).
Library & project
Once the data is in the system, it’s then a process of working through the materials and texture assignment process. This is divided into two panels.
The first, Project, holds everything that pertains to a specific project. KeyShot retains component groups and sub-groups and these can be manipulated as you’d expect.
Components can be hidden and show from here or directly from the interface. The Project panel also contains all of the settings for Camera, Environment and Material. How those Materials and Environments are assigned is from the Library panel.
KeyShot Cloud allows users to search, filter and find new materials and textures from Luxion’s own libraries, third party material vendors and the user community
The Library panel pops up by default to the left hand side of the interface. It’s from here that various assets can be dragged and dropped into a scene.
Materials is a big focus for KeyShot. Its library has been expanding with each release with both new home brew shaders from the Luxion team as well as fleshing out vendor specific options.
For KeyShot 5, the way these are delivered is changing. While the software is still installed with a comprehensive set of basics (from metals, plastics, woods, paints and many more), these can be quickly expanded by taking advantage of KeyShot Cloud.
This new offering allows the team and its community to share various assets. It also covers backplates and environments, which we’ll get onto shortly.
Just log-in, search or browse for the materials (or a close match to adapt) and download them into the installation.
The goal is to create a central resource for the KeyShot community to add, adapt and remix each other’s work and share it. This is similar to what Luxion has been doing in the user forums for quite some time. The difference is that these are immediately available to all users once they upgrade.
Of course, you can also upload your own assets and share them if you feel so inclined. Interestingly, this also enables Luxion to partner with vendors to share texture and material information more readily, without bulking out the installation process.
A good example is how the system is installed with a sample of Mold-tech injection moulding grains, but the full set is now available (searchable by grain code name) to everyone. The same goes for the DuPont car paint materials.
Leather vendor Søresen has also uploaded specific leather colours and textures for use by the KeyShot community.
Assigning materials
The process of assigning materials is straightfoward in the first instance.
If a preset is being used, it can be found in the Library (the search tools come in handy) and then dragged onto the part it is being assigned to. Simple as that.
That material can then be adapted to specific requirements, which can be saved back to the library. If additional details need to be added, these are assigned as Decals on a per material per part basis, positioned, scaled and ready to go.
Previous releases had an issue with the ‘per material’ nature of the beast. Essentially, swapping out the underlying material meant a loss of decals.
From KeyShot 5 onwards, holding the ‘alt’ key will allow you to switch underlying material with a drag and drop, but retain any decals in place.
Environments & HDR images
The next step in the workflow is to experiment with lighting in the scene. KeyShot uses HDR images, which provide adjustable lighting that gives physically accurate lighting and shadows.
The system is supplied with a good set of both interior, studio style, lighting environments as well as a number of exterior scenes.
These can, of course, be supplemented with HDR images that are available from a wide variety of sources, either for free or from commercial photography sites.
While HDR images provide adjustability in terms of size, rotate as well as brightness and contrast, there might be an occasion where you either want to fix an issue or correct something in the file — and chances are you can’t reshoot them.
Here, KeyShot has a couple of options. The first is the ability to add in physical lights. This helps place lights, highlights and shadows where needed as well as to represent light sources in the model.
They can be mixed as seen fit (in terms of brightness, colour etc.) or more standardised IES format lighting description files are available from many manufacturers. These will provide the exact light emission properties that the physical product should.
KeyShot 4 saw the introduction of HDR editing tools in the Environment Editor dialog. This allows for some clever software tricks to add in standard size and form light sources into the HDR image — directly inside KeyShot.
If you want to go further, perhaps to build HDR images for this purpose from scratch, then a third party tool can be used — one of which is HDRLightStudio (see below for more details) which integrates directly with KeyShot as well as many other systems.
Also related to the Environment Editor is a new one for KeyShot 5, namely the ability to automatically create a sun and sky HDR image.
Give the system the location, from a drop down list of cities or using the geographic co-ordinates, the date, the turbidity (which means cloudiness, for the rest of us) and it’ll do the rest.
For most users, this won’t be much use, but for those working in the automotive visualisation sector, it’ll save a lot of hassle.
Cameras & set-up
By now, the workflow will have a model with all of the materials and textures in place.
The user can now work through any design change and quickly rationalise any updates to the model using a variety of methods.
The environment and lighting will also be in place, which means the desired effect is ready — whether that’s an interior product photoshoot, a reflection analysis from a studio set-up or placing a product model in an environment that’s realistic. Just as you would if you’re conducting a real world photoshoot.
The next step in the workflow is to get the angle — again, mimicking the real world photoshoot process. You can, if you choose, use a solid colour as the background, an environment image (assuming you can get the scaling correct — this can be rather tricky) or another way is to use a back plate.
Essentially, this is a static image into which a model is placed. With careful adjustment of the camera, the lens (to match that with which the photo was taken) and some jiggery pokery, you can get a good match — but traditionally, it takes time.
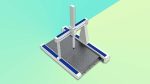
With KeyShot 5, however, the system gets perspective matching. We detail how this works below in our workflow, but the essence is as follows. Position a series of axes in the model window to identify where the same axes lie in the photograph.
This will switch the perspective of KeyShot’s ‘camera’ so everything should match. You can then fine tune the position of the model and render it out.
Figure 1 above of this review shows how it looks and it’s dead simple to use and works very well indeed, saving a lot of time and hassle tweaking things.
Render & post-processing
In terms of computation, let’s rip through the basics. KeyShot is, as is increasingly prevalent, a progressive renderer.
This means that as a model is loaded, materials added and view changed, the render window updates with a streaming view of the final result. That gives a good, solid idea of what is being worked on and the expected results, before you hit that final render process.

The new Duplicate tools allow the instancing of multiple copies of the same dataset without a linear increase in compute requirements that you’d normally expect
It’s also worth a quick chat about network rendering. As use of high-end visualisation increases, so with it does the requirement for more processing horse power.
While today’s workstations (the big desktop bound ones at least) have more processing cores than ever before, but there are always occasions when it’s not quite enough — usually in the run up to a client or management presentation.
To assist with this, KeyShot has network rendering, so that spare workstation and compute capacity can be used when needed.
Set-up is pretty simple and requires that on each slave machine, a small app is installed (it works across both Windows, Mac and a mixed environment) and then everything will run from the master licenses.
These are sold on a per core bundle annual basis and start at $480 for 32 cores, which should cover around eight standard single processor workstations providing that extra horsepower when needed.
At the other end of the spectrum, while KeyShot takes full advantage of all of the CPUs/cores available in your local workstation, these can max out and when that deadline is looming, you need a little more push.
It’s worth noting, however, that you can now limit the use of the cores in your local workstation to keep a core or more free for other tasks.
Animation
We’re rapidly running out of room for covering the animation tools in KeyShot, but these are pretty simple and effective.
There’s a couple of prebaked animation styles (turntable, rotisserie) that provide quick, effective results without much hassle.
For KeyShot 5, these haven’t changed a great deal, but it is worth noting that the component fade in/fade out options are a nice introduction, allowing you to animate the transparency of a component (or group) to give animations, particularly when showing internal details or assembly/disassembly, a little more clout.
Conclusion
With KeyShot 5 the team at Luxion has shown that there’s room to improve what’s already an incredibly easy to use system. KeyShot’s strength is in the simplicity of the process.
I’m sure there are more powerful renderers out there, but to be frank, most of us don’t have time to spend fiddling with dialogs and tweaking settings — there’s work to be done and stunning images are a requirement rather than a luxury these days.
Seemingly small updates, such as the sky and sun generator, the perspective matching tools and many others, are perfect additions. They solve workflows and common issues that many might face and allow them to be completed in a couple of clicks, rather than hours spent rendering, swearing at the screen and re-rendering.
New users won’t spot the user interface refresh, but existing users will find those commonly used but hidden options more readily available — that’s always a bonus. And, if you don’t like the new toolbar across the top, you can simply switch it off.
The introduction of KeyShot Cloud is a smart use of cloud technologies. Rather than having a separate website where these things are stored, you access them in the application and download them directly and use immediately.
But perhaps the biggest highlight, particularly for those working with large datasets, is the ability to work with NURBS data as well as tessellated meshes.
As we all become more comfortable with creating ever more sophisticated imagery, our tolerance of poorly constructed surfaces diminishes. While it’s not yet ideal, it’s a good start and with options to switch specific components where needed, will round it out perfectly.
Once again, KeyShot’s simplicity belies its power. The fact that you can load up a model, throw on the materials and textures, chuck in an environment and back plate, and render it, without too much preamble, knob twiddling and general fannying about, is the perfect mix.
HDR Light Studio & KeyShot: Mastering custom HDR environments
KeyShot 3.1 introduced the Environment Editor, which allows KeyShot Pro users to adapt and edit, in basic terms, any HDR image that they’re working with, directly inside the rendering system.
But what happens if you can’t find an image to adapt, want to add realistic light sources to a physically captured environment or to build perfect lighting from scratch to match your own requirements?
The options are limited. Everyone’s favourite image editor, Photoshop, has, for some time featured HDR image editing features but these are not well suited to creating HDR latitude-longitude lighting images.
HDR Light Studio includes synthetic lights as well as those that provide accurate lighting and reflections from real world light
A much better alternative is HDR Light Studio, which starts at £195. This brings a small, nimble application providing a set of tools that are explicitly developed to assist with creating and adapting HDR lighting images for design visualisation.
Essentially, you can either start with a background gradient or an existing HDR image, then use the tools to add in procedural or image based lights. Procedural lights can even be used to locally adjust exposure, colour and saturation.
The system also includes a library of photographic light sources that add total realism to your shots. Whether it’s soft boxes, spots, real windows, there’s a huge choice with a great deal of options available.
All of the lights in the system can be positioned, rotated and adapted according to real world lighting values, rather than an abstract numerical range.
At all times, HDR Light Studio has a real-time preview window that lets you judge the effect of your edits on either an industry standard teapot or a custom model you load in. The last release saw the introduction of a tool called LightPaint.
LightPaint provides point and click lighting simplicity — click on your model where you want the highlights, illumination and rim details (along hard edges) and the system calculates where to position the light source on the HDRI map to get the desired effect.
KeyShot (on Windows only) can also launch a live session with a HDR Light Studio image so you can see the effect of your lighting edits in real-time.
| Product | KeyShot 5 |
|---|---|
| Company name | Luxion |
| Price | on application |