The hype of the 3D printer market, particularly at the desktop level, is pretty much over. While there are still new entrants (most of which are crowdfunded projects), things have settled down.
We now have a much smaller core of desktop machine manufacturers and, to be frank, the ones that have survived have done so by delivering the goods or by having critical mass.

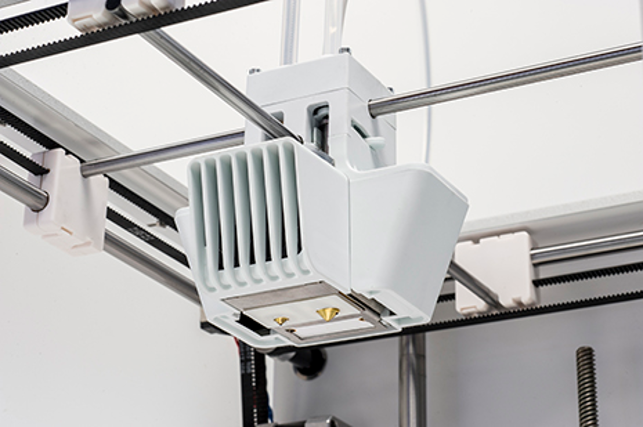
Core to the Ultimaker 3’s capabilities is the dual nozzle extruder mechanism — with swappable print cores

To swap print cores, you simply tell the system you’re doing it (using the control panel),
pop the case down, pull it out and snap in the new one
One of the leading lights in this group of survivors has to be Dutch manufacturer Ultimaker. Having started off as a competitor to Makerbot in 2011, the company has built a faithful following and has shipped a lot of its eponymously named products.
While the Ultimaker machines rely on the same core build process as most desktop focussed machines (namely, layers of material built up by extruding each layer of filament), the company has differentiated itself by remaining open, in terms of material support, despite moves to the opposite end of the spectrum by its key competitor (which, let’s be frank, is Makerbot).
While the first generation of the machine had a kit-based, self build approach, the Ultimaker 2 saw the company get serious as it moved away from this DIY ethic to deliver solid products, which also helped it build a brand that’s known for quality alongside openness.
This leads us to the Ultimaker 3 family — which changes the game entirely. From the ground up, this family of products (currently there are two options which we’ll cover shortly) has been developed to suit a much more demanding audience than that which the company has traditionally addressed.
The whole product looks slick, works more efficiently and addresses the reliability that the professional user needs.
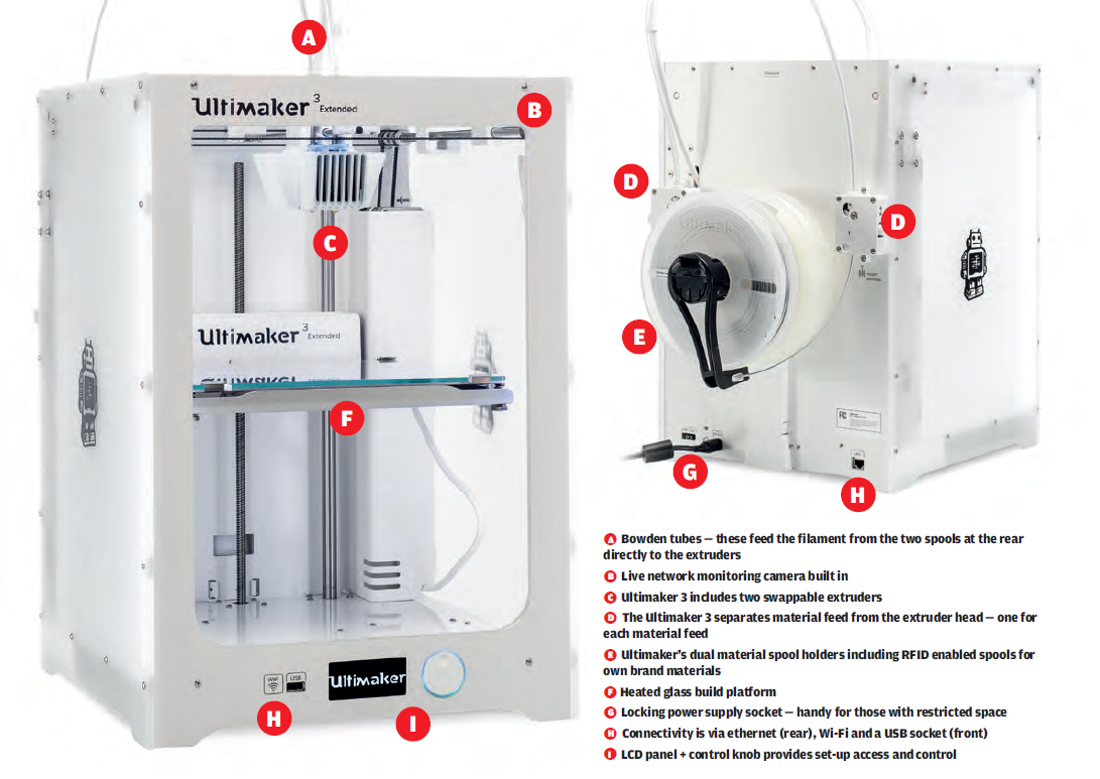
We got hold of an Ultimaker 3 Extended, that builds on the standard product’s build envelope of 215 x 215 x 200mm by giving it an extra 100mm in the Z axis (vertical). This results in a whopping 215 x 215 x 300mm build space.
Out of the box and set-up
The Ultimaker 3 arrives in a simple cardboard box. It’s clear from the outset that the machine has been thought out, from unpacking to everything that follows.
Opening the box, you’ll find the printer strapped into place and using the strap, you can lift the whole thing out and unpack it very quickly (something that’s a royal pain in the arse with most other machines).
Once you’ve got it undone and set up on your desk, the next stage is to strip out the other packaging and unpack the accessories kit.
The machine is supplied with everything from the usual set of tools, to lubrication, glue for the build plate and the heat resistant glass platform itself.
Instructions are clear and you’ll soon have it connected up to your office Wi-Fi or network (it supports both, with the addition of a USB slot on the front of the unit). Once connected to the Cura setup software, you’ll next need to address the materials set-up.
The Ultimaker 3 supports two materials, mixing together a split feed mechanism from the rear mounted spools and a dual nozzle build head.
This assembly is perhaps the smartest thing in the whole machine. It not only allows you to print with two materials, but also provides the active levelling, that’s a core part of its use.
To get up and running, you’ll need to load in the materials at the rear. Attention paid here to the instructions (and taking a few notes for future reference) pays real dividends.
The spools are mounted in a specific order, depending on the extruder you’re feeding material to. As default, out of the box, you’ll most likely run with the machine as standard, with the gray PLA build material heading to extruder 1 and the dissolvable PVA-based filament heading to Extruder 2.
The machine guides you through the process and there’s a knack to doing it efficiently, but there are no major challenges.
One thing that helps is the NFC enabled material spools that Ultimaker supplies.
This means that the machine will know that the right material is in place and when to feed it. Everything is driven from the small display and rotary dial on the front of the unit and is clear at most times – just think it through for the first few builds.
To get that first build going (assuming you’re not running with the standard Ultimaker Robot test build) load up the Cura software and import your geometry.
Cura supports not only STL, but also some of the newer 3D print formats that are gaining ground such as 3MF.
You can import multiple files at once or individually and the system will attempt to rearrange your build platform to fit them all on. If not, you can, of course, adjust them manually if you need to tweak position or rotation.
You then define your build parameters from drop down lists. The most important is layer size or resolution of the part. The machine gives you four options, ranging from Draft (which builds at 0.2mm layers) through to Normal (0.1mm) into the realms of high Quality (0.06mm).
You can also choose from the other usual options for in-fi ll level, support requirements and such. Supports are, of course, another key focus for this release.
The dual extruder allows two things to happen. Firstly, if you run with the PVA filament (a spool of which is supplied with the machine), then supports can be built with this, rather than PLA. This means that once the build is complete, you simply soak the part in tap water (warmer is better) and eventually it’ll all dissolve away.
Secondly, it also allows you to run with two build materials, which we’ll explore shortly.
While you can dive in and tinker with all of the settings, the presets are both comprehensive and pretty robust. It’s simply a case of deciding which resolution you want the part in and how solid you want it.
That’s a toss up between a rougher finished part (in terms of surface quality), how tough you want it versus how quickly you want it.
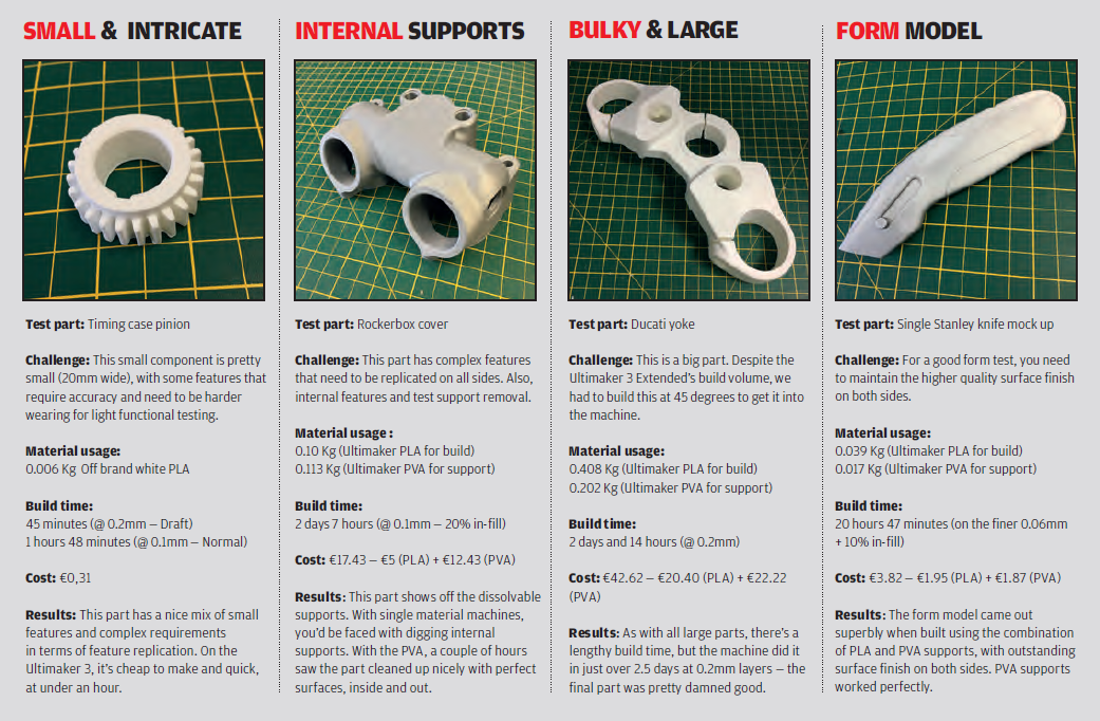
We found that the normal mode is a good trade off, but if you want parts super quick, then the draft mode cuts the build time by half, or more, if you run with the parts at a lower in-fill rate.
As an example, using the default settings, our small pinion gear part builds at around 1 hour 45 minutes at normal with light in-fill. Switching to draft mode, gets you the part in 45 minutes.
The bigger the part, the bigger the differences.
The Yoke model we built took up most of the build chamber (to fit it in, in one piece). At Normal resolution, it would have taken over 7 days to build.
By reducing the resolution to 0.2mm, that dropped to just over two and a half days.
Once you’re ready and checked the previews (you can see the model in zray mode as well as a full preview of part and supports), the last job is to send the data to the machine – either over the network or using a USB file with the build file on it via the USB slot in the front of the machine.
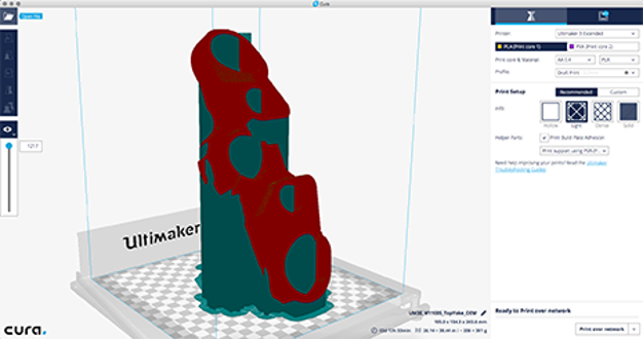
Ultimaker’s Cura set-up software — easy to use, but open enough for you to dive in and tweak your settings when you want to
Dual material set-up
Dual material printing might be of interest to many users. Here, the Ultimaker’s fl exibility pays dividends as while the default set-up is for a single build (be that PLA, ABS, Nylon) with dissolvable materials, you can also do some more interesting things.
One application might be to build a part with multiple colour fi laments (in our example, we had black and white PLA). As you’ll see from our workflow below, the set-up process is pretty simple and in terms of hardware, you just need to swap the second printcore extruder for the build material version (supplied with the machine).
Essentially, the machine guides you through the process and, assuming you follow instructions carefully, it’s a breeze. There’s also potential for you to build with two different material types. Ultimaker provides a range of materials that are ready to go — and with the NFC tagged spools, set-up is pretty easy.
This means that there’s potential to build models with differing material properties, rather than pure aesthetics. Here, I’m thinking about prototypes of overmoulding or two shot injection moulding process.
You’ll never get an exact match for production intent materials, but you’ll be able to have a more realistic representation of mock-ups and such – particularly if you mix rigid polymers with softer materials. But this comes with a word of warning.
Just as with injection moulding, you need to be mindful of the bond between the two. You’re essentially building two, often very different, materials on a layer by layer basis. There’s no melt, injection and cavitation process. We tried it using Ultimaker’s ABS and TPU 95A (the 95A denoting the materials Shore hardness) and the results turned out pretty well.
Whichever combination you try, reading up on the subject is worthwhile. There are also a number of resellers out there, many of who have been asked these questions many times so will no doubt have the answers (we got some good thoughts from the team at 3dgbire.com).
Of course, you also need to bear in mind that not only are you building the part itself, you’ll also need to build the support structure in one of those materials as well – the machine only has two extruders, so you can’t use the dissolvable supports in these instances.
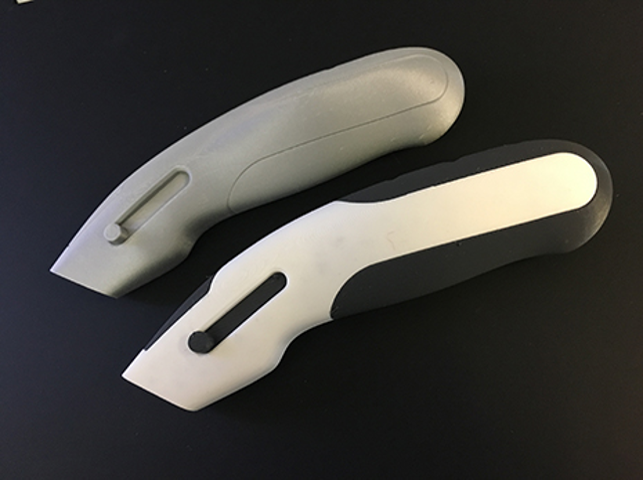
Single material block model (above) printed with PVA supports and a dual material block model (below) with two colour PLA build. Both were built at 0.06mm layers and the surface finish is incredible for a desktop machine
Running costs
Let’s talk turkey. What does this machine cost and what are the on-going costs of operation? The machine comes in two flavours; the Ultimaker 3 and the Ultimaker 3 Extended.
The standard machine costs €2.995 while the larger Extended version (which we tested) costs €3.695.
For that, you get the machine and set-up kit, including all of the usual tools, consumables (such as glue for the build plate, oil, various cables) and one build plate. You’ll also get three extruders – two for build materials and one that can be swapped out for the dissolvable support. It’s also supplied with two spools of material — one grey PLA and a spool of PVA support.
In terms of consumables, you’re pretty much looking at just the extruders, which will eventually wear out depending on both your use patterns and the materials you run (some are more aggressive). These are around the €100 mark each.
With the build plate being glass, rather than plastic (such as one on the Makerbot we looked at last month), you’re going to get a lot more wear and tear out of this so I don’t imagine you’d need to change it all that often.
Now, you’re pretty much all good to go other than materials, and this is where the machine wins out. The combination of an open approach to filaments, software that enables you to tweak and define new settings based on manufacturers recommendations or your own experimentation, and some open hardware choices, offers you a massive range of options when it comes to materials.
As long as you can set the parameters to match and it comes in 2.85mm filament, you’re good to use it. Ultimaker supplies its own brand of filaments and the range is comprehensive, including PLA, ABS, Nylon, CPE (for chemical resistance), Polycarbonate as well as the TPU 95a — most of which come in a range of colours and finishes. Prices range from the usual 40 quid a spool to higher prices for more exotic materials.
Then there’s the whole industry of filament providers to choose from as well. While you won’t get the ease of use from Ultimaker’s RFID tagged spools and quick set-up, there’s huge potential out there. We tried some of ColorFabb’s bronzefill material to see how the machine handled it and it did superbly once we’d dialled in the settings.

In conclusion
The Ultimaker 3 is a fantastic bit of kit, especially considering the price point. Although there are similarly capable build volume machines out there for less cash up front, what you get here is a large build with the flexibility of material choices, both from Ultimaker’s own range and the wider filament market.
The fact that experimentation is supported and encouraged makes it a very versatile machine. For those who want to knock out quick, rough mock-ups and then be able to dial down the layer size and output high quality models, this is a killer choice.
The addition of dissolvable support material also makes it very appealing. Lastly, if you want to get fancy, you’ve the ability (and the parts required to reconfigure the machine) to print with dual materials.
If I had one concern, it would simply be that the monitoring of print jobs could be a lot easier if the integrated webcam and control of the machine could be done over the web, rather than just over the local network. If you’ve got a three day build, you don’t want to leave it entirely unattended, at least for the first few runs.
Oh, and the ability to switch off the bright lights would be handy too – nothing like your landlord asking what the whirring noise and bright light from your office over the weekend was, to spoil your Monday morning.
Other than that, it’s a solid offering at a very reasonable price. The consumable costs are lower than other machines at this price range – there’s no replaceable build platforms or coatings required – you pretty much just feed it material and eventually you’ll need to swap out the extruder printcores.
Operation is painless once you’ve learned the menus and the options and how to handle them.
Levelling is handled automatically and job set-up is pretty easy once you learn the intricacies of the Cura software.
If you’re looking for a versatile machine for the design office, then this should be pretty high up on your shortlist. There are plenty of options and flexibility here and the results are first class.
Quick models when you want them and if you have more time and need those high quality prints, then you have that option as well.
Tech-specs
» Ultimaker 3 Extended
» 2.85mm filament
» 215 x 215 x 300 build volume
» 342 x 505 x 688 mm machine dimensions
» 11.3 kg weight
» 0.02 to 0.4 mm layers
» Material spool, dual extruder & heated build plate
» USB key, ethernet and Wi-Fi connectivity
» On-board camera & network monitoring
» Active levelling
» 1 year return to base warranty