Form 2 – When Formlabs launched in 2014, it brought stereolithography to the desktop for the first time. Al Dean takes a look at the recently launched Form 2, which improves on the first-generation machines to deliver a more reliable, user-friendly experience
Last year, Formlabs launched its desktop stereolithography machine, the Form 1 (and subsequently, the Form 1+) to much interest from the professional design industry.

The Form 2, along with its PreForm software and materials cartridges
With its sleek form factor, this machine brought the lightand-resin 3D printing process to the desktop at an unprecedentedly low price point.
Since then, the company has followed up with the next generation of its desktop machines, the Form 2. If you read our November 2015 cover story , you’ll have learned how the Formlabs team focused on things that they just couldn’t squeeze into the first-generation devices or needed to solve with them, in order to deliver a much more robust and reliable machine.
We’ve now had the chance to put the Form 2 through its paces over the last couple of weeks, so we’re now able to offer a complete run-down of our experiences and a more thorough review of what the company’s managed to pull off here.
Form 2 – Out of the box
The Form 2 arrives in two large-ish boxes.
One contains the machine; the other contains all of the ancillary equipment, including removable parts, resin, the resin tray, the build platform and the finishing station.
Getting set up, we’re happy to report, is pretty pain-free. The machine is removed from the box, unwrapped and placed on a worktop.
A simple set-up sheet is provided, to guide you through getting the software installed and loading up the machine.
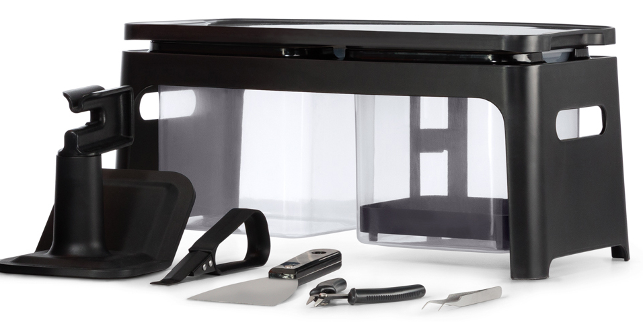
The reworked finishing station for the Form 2 includes two isopropyl alcohol bins, a work area, a pry bar, a holder for the build platform and the usual flat-edge snips and tweazers to help break off the supports
In terms of power requirements and work area, you’ll need a stable surface for the machine and preferably one that you don’t mind getting a little messy, although this is much less of an issue than it was with previous versions.
To set up the Form 2, you can either connect it via USB or use the machine’s on-board touchscreen to add it to your wireless network.
While I’d prefer to avoid comparisons to regular office printers, you’ll have a similar (but arguably, better) experience with the Form 2.
In order to prep the machine for printing, there are a couple of steps to follow: you’ll need to slide the resin tray into position, snap in the wiper blade (again, we’ll get to that shortly), then slot the resin cartridge into the back of the machine.
It’s at this point that the differences between the Form 2 and its predecessors become most apparent: rather than having to carefully pour your resin into the resin tray, the Form 2 has a nifty auto-loading mechanism. You just slot in the resin cartridge and away you go.
As you carry out these tasks, changes are reflected on the touchscreen, showing you that the tray is correctly loaded, for example, and that your resin has been added — including details of which cartridge and which material are in place.
The last job here is to slide on the build platform, which is located on the Z-axis and fixed with a clamp. Once that’s done, you’re ready to get your first print job running.
Getting printing
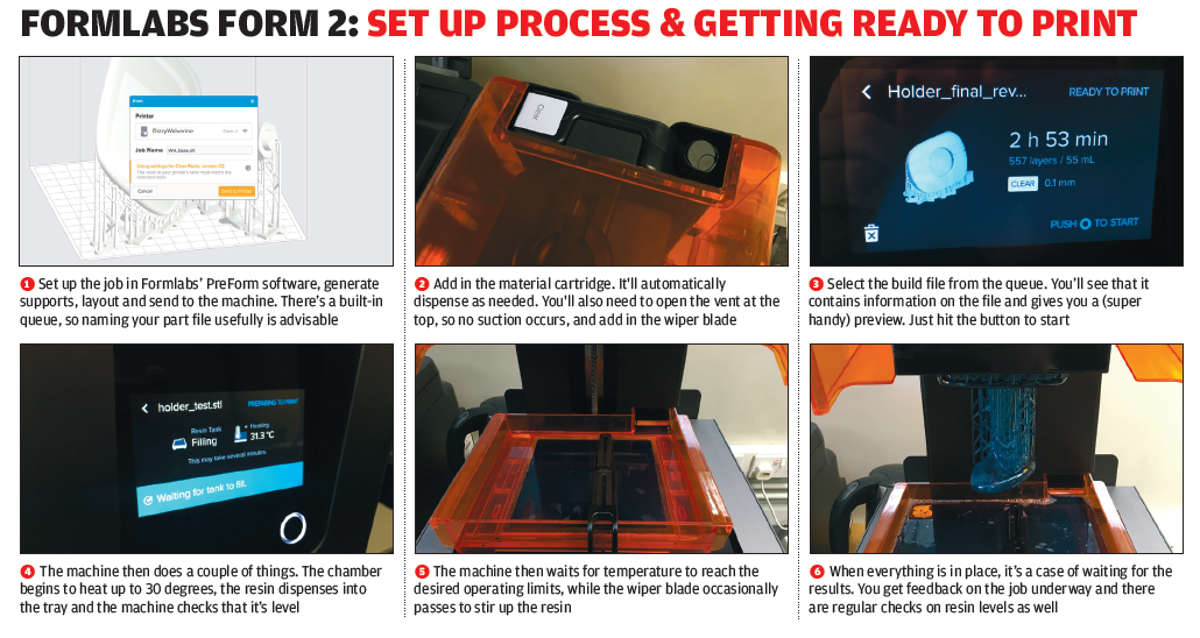
We break down the set-up process graphically below, but the process for getting your first job up and running is pretty slick.
To enlarge image click here
The Formlabs PreForm software lets you load and (if necessary) repair your STL data and asks for details on the material you’re using and the layer thickness you require.
There are a couple of reasons this information is needed, the main one being that the support structures generated in the system are fine-tuned to match the requirements of each material. It also means that, when you send the job to the printer, you can select the correct build file from the job queue (another new feature for this machine).
With a single click, the system can take the strain when it comes to the orientation of your part and the generation of supports. Or, if you prefer, you can dig in yourself, manually adapting the position, the rotation of the parts and the location of supports.
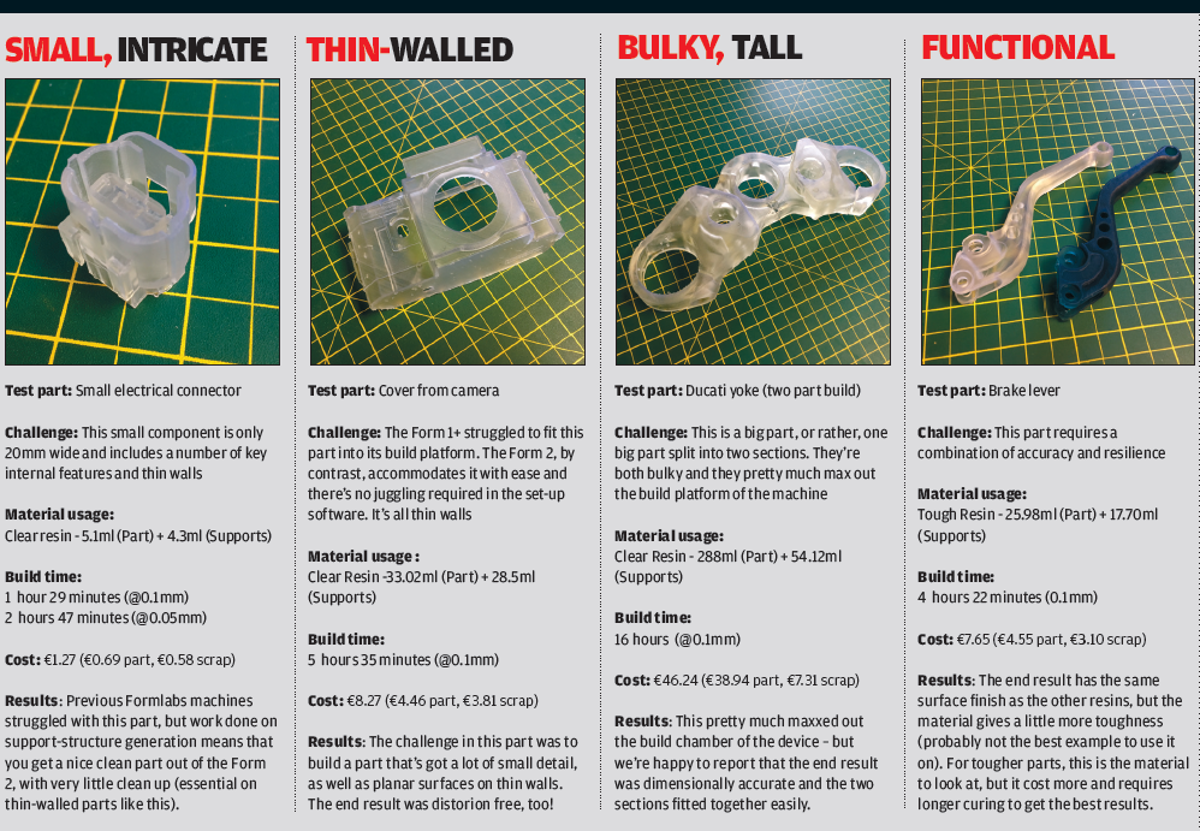
For most jobs, the automated process works best — but there will be some instances where you need to exert a little more control. You might be arranging multiple parts to fit on the print platform in a single build (which we did with our Ducati yoke example, pretty much maxing out the build chamber in the process), or you may want to adapt the support positions, either to add more support to particular features or to move them, so that you can squeeze more parts into a single build.
With those decisions made, you’re ready to send the job to the printer. If you’re connected by USB, this will be pretty quick.
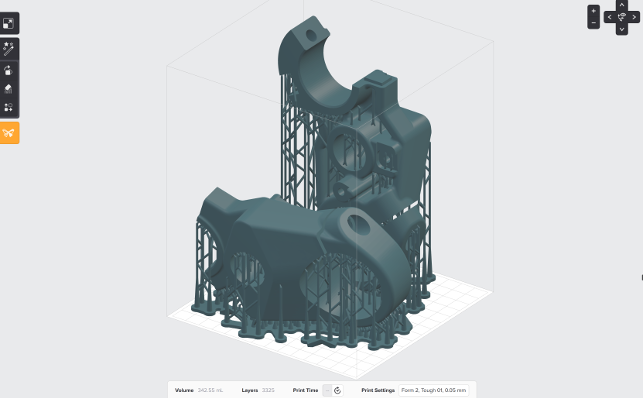
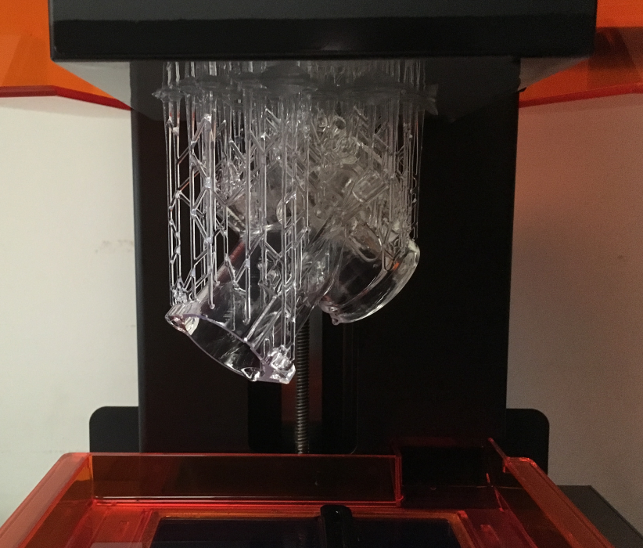
Our two-part Ducati yoke, built on the Form 2 in a single run
If you’re connected over wireless, you may wait a while — particularly if it’s a complex job. Either way, you’ll get a notification in the application that the job has been sent.
Then it’s time to move on to the printer.
Form 2 – Machine prep
The Form 2 has some interesting features that you need to get your head around before you start printing, so let’s deal with those first.
For a start, the Form 2 has many more on-board controls for handling print jobs than its forerunners. There’s a print queue, for example, which makes managing multiple print tasks sent by a design team much more efficient.
The on-board memory can store a good number of these, but the more complex the jobs, the quicker available storage is used up. For each print job, you get a graphical preview, an estimated print time and notification of the material that will be used.
Once you’ve selected the job you want to start, the machine begins to prepare itself.
It will start to fill the resin tray from the cartridge and you’ll notice the wiper blade occasionally passes over the resin tray.
During the build itself, it’s this wiper blade that clears the resin window of any debris, but at this stage, it simply serves to stir the resin. For most materials, this stirring may not be needed, but as more complex materials become available, it’s likely to help, particularly if Formlabs goes down the route of introducing composite-filled resins.
At the same time, the machine begins to heat up the build chamber. It’s a little-discussed fact that the operating window for photo-curable resins is pretty narrow, particularly at the lower end.
In other words, temperature can play havoc with desktop SLA machines if they’re not kept above 18 degrees or so. With the Form 2, Formlabs has introduced a heated chamber, so the system won’t start until the whole build environment is warmed to a toasty 30 degrees.
You can override this control if you want, but my personal advice would be to wait if you want the best results from your print.
Then it’s pretty much a case of just waiting for the job to finish. You get a countdown on the display panel.
Formlabs has also started to add in some web-connected services for monitoring your print jobs using its Dashboard — this also gives you the option to add in both email and text-based notifications about the status of your build.
Post process
Once your build is complete, you then remove the build head and move on to the finishing station.
This is an area where a lot of effort has gone into addressing issues often associated with desktop SLA. Removing a set of partially cured parts from a build platform can be a tricky process, particularly when you’re working with large parts.
Formlabs has thought through this process carefully and made some useful improvements. For example, the machine comes with a holding device that clips into the build platform, allowing you to work the part and its support off that platform without sticking sharp objects into your fingers.
To enlarge image click here
You then move the part to the new rinse tubs. With the Form 1 and Form 1+, you essentially got a pair of plastic Tupperware-like boxes for holding the isopropyl alcohol used to rinse the parts and a fold-up net with which to fish parts out of these tubs.
With the Form 2, you’ve got a nifty stand for the two rinse tubs and an injection-moulded device to lift parts from them.
There’s also a well-designed tray to contain loose resin — but the real killer is the handle-like device supplied for holding the build head. This serves to keep your fingers well out of the way of the various devices used to remove parts from the platform — and alongside this, there’s the usual set of snips and a scraper.
Once parts have been rinsed — 20 minutes should do the trick — then you need to remove the supports. In some cases, these can simply be ripped off, but that could lead to blemishes on the part.
This is where the snips prove really useful. Then it’s time to post-cure the parts — perhaps in a low-cost UV oven or simply by leaving them on the window sill.
Requirements vary according to part size, part complexity and the material used. The tough resin, we found, requires a couple of hours post-cure to achieve the best mechanical properties.
Conclusion
Inevitably, we’re tempted to draw comparisons between the Form 1+ (which we looked at back in 2014) and this new machine — but, in fact, the overall experience is like operating two entirely different machines.
The build process is still the same, but nearly every other aspect of the machine’s operation has been revisited and improved, leading to a more professional and more robust device.
The support generation inside the PreForm software saves you resin (by making the structure more efficient), but also, combined with the more robust build environment, gives you easier to breakout parts
What do I mean by “more professional”? The answer is this: when it comes to building parts in a busy design or engineering office, with the time and cost pressures at play in that type of environment, you need a machine that’s reliable and efficient, certainly.
But beyond that, you also need any feature or function that has the potential to strip time from the process.
Each and every time saving, after all, has real value in a professional environment, whether that’s time saved in setting up files and pre-processing data, time saved in setting up the machine itself and prepping it for a print job, time saved in the build process itself, or time saved in part removal and post-processing.
What’s intriguing and most impressive about the Form 2 is how holistic, ‘whole process’ thinking has been applied to the machine’s design, along with the fact that the price hasn’t gone up dramatically.
It’s a dream to set up. Loading materials is easier and less messy. And getting finished parts off the machine is a much less accident-prone process.
In short, Formlabs has already managed to do something remarkable with the Form 2 — and there’s more to come.
The company is developing its range of resins, with a view to expanding the available colours and mechanical properties (there’s now a tough variant and a flexible resin), and introducing more special-purpose materials (for casting, for example).
All this makes the Form 2 a compelling toolkit for the design office and one that I’m happy to recommend.
Desktop SLA machines: tips & tricks

Printed your parts? Get the best results with a rather handy UV steriliser for post-build curing
Over the last year or so, the DEVELOP3D Workshop has seen more than its fair share of desktop stereolithography machines pass through its doors. Al Dean looks at the machines, how they work and what he’s learnt from using them.
| Product | Form 2 |
|---|---|
| Company name | FormLabs |
| Price | £3,299 + VAT (inc. machine, finishing kit and 1 litre of resin) |