The Makerbot brand has been through something of a change in the last few years. Growing out of the hardware hacker and open source community in Brooklyn this start-up, which was founded in 2009, brought 3D printing to the masses with its first few generations of device.

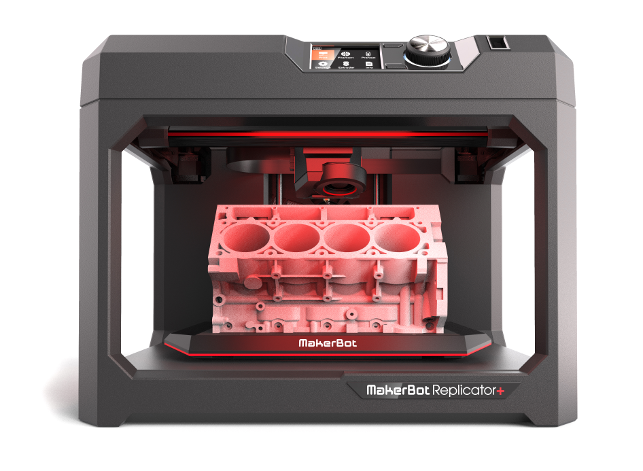
The Makerbot Replicator+ is a clean and simple machine that has produced the goods during our tests
Due to increased sales and popularity, it inevitably grew and made some changes to its business model. Then in mid 2013 Makerbot announced that it was being acquired by the larger industrial 3D printing company Stratasys.
Its fifth generation printers got a bad name on the market, partly due to some quality issues (as Makerbot scaled up its business) and partly due to some decisions that went against the company’s original ethos of having a more open approach.
The introduction of sophisticated technologies (such as more proprietary technologies and less user serviceable parts), resulted in unfavourable reviews of units. Many looked at the acquisition by the old guard Stratasys and departure of founder and figurehead CEO, Bre Pettis, as an indicator that the company had irrevocably changed and the products were suffering as a result.
Not that this has harmed sales. Makerbots are everywhere. We’ve seen them in small start-ups and huge multinationals and everywhere inbetween.
When folks outside of the design and engineering community think of 3D printers, they often picture a Makerbot, such is the brand recognition.
As a result, it was with some interest that near the end of 2016, the company launched its latest products — the Replicator+ and, the smaller sister machine, the Replicator Mini+. Billed as the desktop machines for the professional, there is less tinkering, more intelligence, greater automation of set up and more consistent results.
So let’s dive into the Replicator+ and see how easy it is to set up and whether those claims of greater reliability and better results do indeed stack up.
Out of the box experience
One of my personal benchmarks of how well thought out a product is, particularly in the 3D printer world, is how quickly you can get the machine out of the box and working.
After all, in the professional realm, time is everything. If you’re spending six hours setting up a new bit of kit, you’re not being productive and getting the actual job done. And the good news is that, in this regard, the Replicator+ wins.
The process is as you would expect from any of today’s consumer electronics. The packaging and instructions are clear. You pop open the box, extract the machine and set it up in your chosen position. As a tip, use a sturdy table or set of shelves.
This thing is fairly heavy (at 18kg) and will give a less than rigid desk a run for its money.
Once you’ve followed the instructions to remove the inevitable bits of tape and position retaining plastic, you’re ready to get it plugged in and switched on. To get the machine connected to the wireless network (there’s an ethernet option too), you connect your mobile phone to the machine. That sounds peculiar, but it makes sense when you realise that the set up process can be driven from the new Makerbot Mobile app.
You then guide the machine through the connection to your network, give it a name and start it up for the first time. You’ll get instructions both on your phone (you can also do this using a computer) and on the bright, clear LCD panel on the machine itself.
Once it’s set up, you’re then provided with instructions on how to attach the extruder module (which is a delightfully mechanical process), load material and get a test build on the way.
But we’re getting a little ahead of ourselves — let’s step back and look at the constituent parts.
Getting your first print on
The Replicator+ is a big machine and rightly so. With a build volume of 295 x 195 x 165 mm, it’s 25% larger than the previous generation in a cabinet that’s not much larger at all.
Material feed, if you’re using Makerbot’s materials, is from a reel holder built into the rear of the unit that pops up when you need it (see image below).

While you can drive the machine from the desktop software, the on-machine controls, with dial, buttons and LCD display give you ultimate control and access to maintenance
The extruder is a separate unit and this attaches to the drive controls inside the unit easily and quickly. Once it’s snapped into place, the machine locks it in and you can start to heat up the extruder and load your filament (which is fed through to the extruder via a white plastic tube). All in all, it took five minutes to set up the machine, connect to the network and download updates before it was ready to print.
The last stage is to ensure that the build plate is attached. This is a key change for this update to the Replicator range.
Rather than relying on a number of different home brew hacks (which range from blue painter’s tape to glass build plates), Makerbot has developed a flexible build plate that provides just enough grip to build parts on and enough flex to be able to pop the parts off the build plate once complete. To get the machine printing, you slide this into place and hit the go button.
The machine then works through a cycle of automatic calibration of the build plate (another key new feature for this updated machine) and away you go.
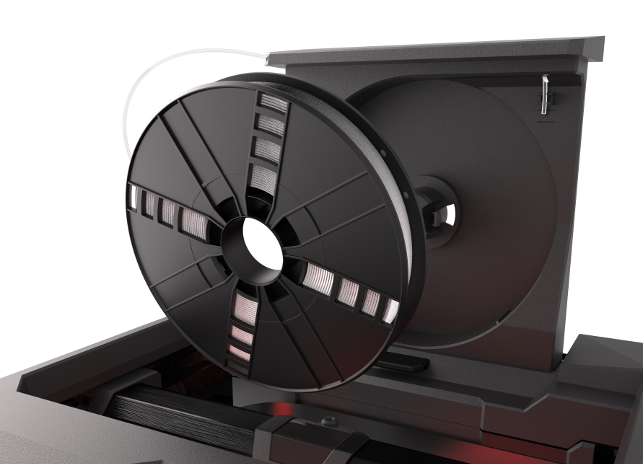
Makerbot’s Replicator range now features an integrated spool holder and feed mechanism
Software is fundamental
Of course, we all know that to make the most effective use of any 3D printer we’re reliant on good software to get the job set up and running efficiently.
While its previous generation of products have used the company’s Makerbot Desktop software, this new generation is starting to take advantage of the newer Makerbot Print. This replaces the existing system and brings some interesting new capabilities to the table, so let’s explore the workflow.
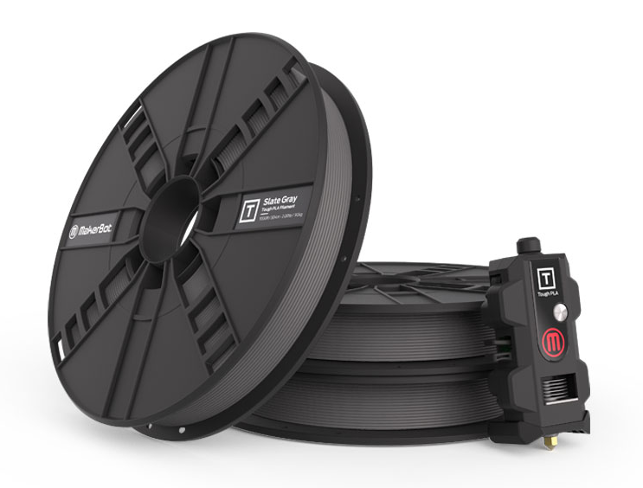
The Replicator+ brings a new tougher PLA material and associated print head
Makerbot Print is a much cleaner, more modern experience than the pre-existing Desktop software. As soon as you start up the app, you’re presented with a nice, clean build platform onto which to place your parts.
While in almost every other 3D printer software you’re looking to pack out a single build envelope, Makerbot (in conjunction with the GrabCAD folks) has integrated a set of tools that are project focused, rather than singular build.
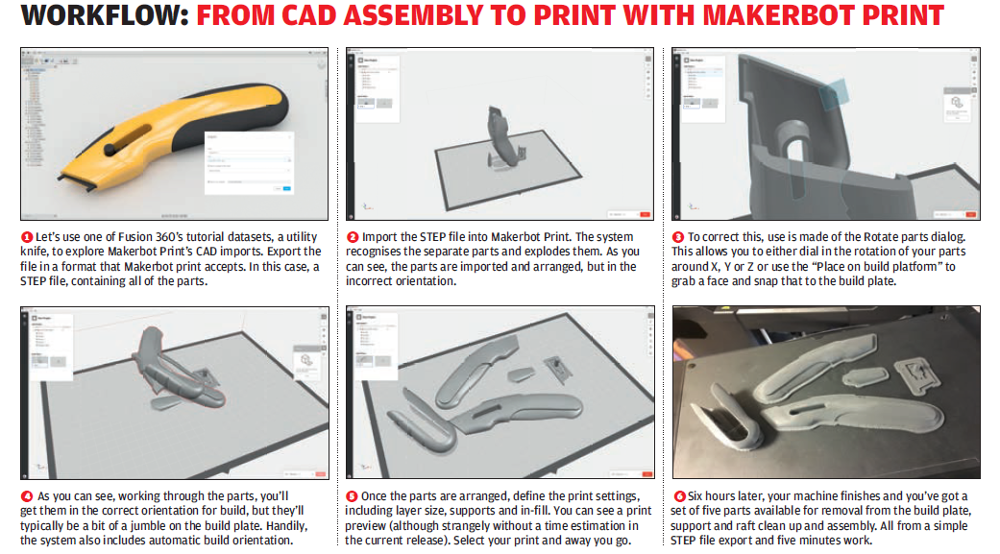
Alongside the usual STL import, there’s also a set of import options for CAD native formats. The system has been built (using GrabCAD’s knowledge) to allow you to bring in an assembly file (whether a native format or as a STEP or IGES file) and have the system do much of the heavy processing for you. It’ll bring your parts in, explode them slightly and present them into a single platform.
Unless you’re lucky, chances are you’ll need to adapt your parts to the correct build orientation. Here, the rotation tools come in handy as you can use the “Place Face on Platform option” to automatically rotate the parts correctly by selecting a planar face and telling it which direction this represents.
Once your parts are all oriented properly, you can then use the autoarrange tools to pack out your build platform and give enough clearance between parts. If you’ve got too many components to fit onto a single build, Makerbot Print will create multiple build jobs and spread out the components across them. The nesting tools are massively intelligent (they seem to work off bounding boxes, rather than specific geometry) and, as a result, you might need to adjust and move parts between builds to make the most of the time you have.
A project can be saved in its entirety, rather than as separate builds, which means if you have a set of components you want to regularly print or, indeed, archive, then you’ve got the perfect mechanism to do so.
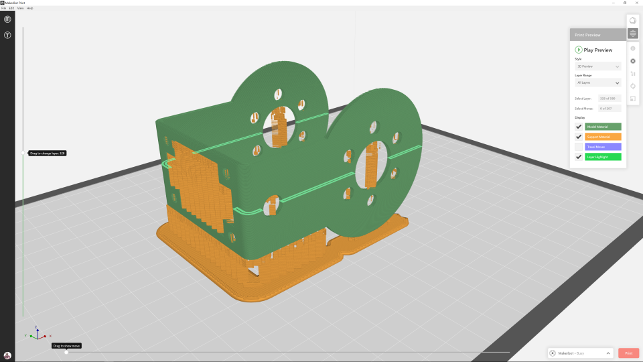
Makerbot Print — released with this machine to replace the rapidly dating Makerbot Desktop — isn’t quite ready yet but updates are coming fast and furious
Running costs & consumables
Let’s talk about consumables for the machine as these represent the majority of costs if you’re pushing the usage of this machine to its limits.
The most obvious consumable is the material and if you’re running with the Makerbot branded materials, you’ve got two options.
The first is the Standard PLA, which comes in at around the £15 mark for a smaller spool of 0.22kg whilst the larger 0.9kg spools cost around £35. These come in a wide variety of colours, so if you’re looking for something project specific then you’re in luck.
Of course, as the machine runs with PLA, you’re also (although Makerbot says it’ll invalidate your warranty) able to run with any of the standard 1.75mm fi laments that are on the market.
We did a few tests with this and it worked well, but do so at your own risk and with the knowledge that as yet, you don’t have fine control over the print settings for the machine, as you’re reliant on the Makerbot Print software rather than Makerbot Desktop.
Another consumable to consider is the extruder unit. A standard Smart Extruder costs £200 a piece and a replacement cycle will depend on your use patterns, as you’d expect, but I’d imagine a well maintained one will last a year or more.
The second Makerbot branded material you can use is the Tough PLA, which is a cracking material for harder prototype use but its costs are a little more complex than the Standard PLA.
At present, the only way to use this and to get the replacement Smart Extruder specifically for it, is to buy a bundle that includes three spools of the grey Tough PLA filament and the associated extruder, which costs £319.
The last thing to consider in terms of consumables is the surface on which the builds are made. While the base plate is used constantly (and there’s no need for a spare or a replacement as far as we can see), you will eventually need to replace the self adhesive sheet. These are available for a pack of three for around £34
In conclusion
In terms of print quality, the Replicator+ is good but as with all single build material machines, you need to trade off the surface finish against the faces or surfaces that you have in contact with the build platform and supports.
Makerbot has done a pretty nice job of improving the software side of things so that the supports are easily removed and the model cleaned up.
Compared to some other desktop, filament based machines, the surface finish is reasonable, particularly if you choose the finer 0.1mm setting (though this is offset against time increases). If you run with the 0.2mm layers and higher, you can get your parts out of the machine more quickly, but surface finish will suffer.
If you’re just running a quick, rough model, then that’s good — it’s handy to be able to get parts off the machine within a couple of hours during the working day, rather than running over night.
In terms of the ideal use case for the machine, I’d say that it’s best when you’re working with larger (and it has a pretty decent build volume for the price), chunkier parts — machined components, more substantial forms etc.
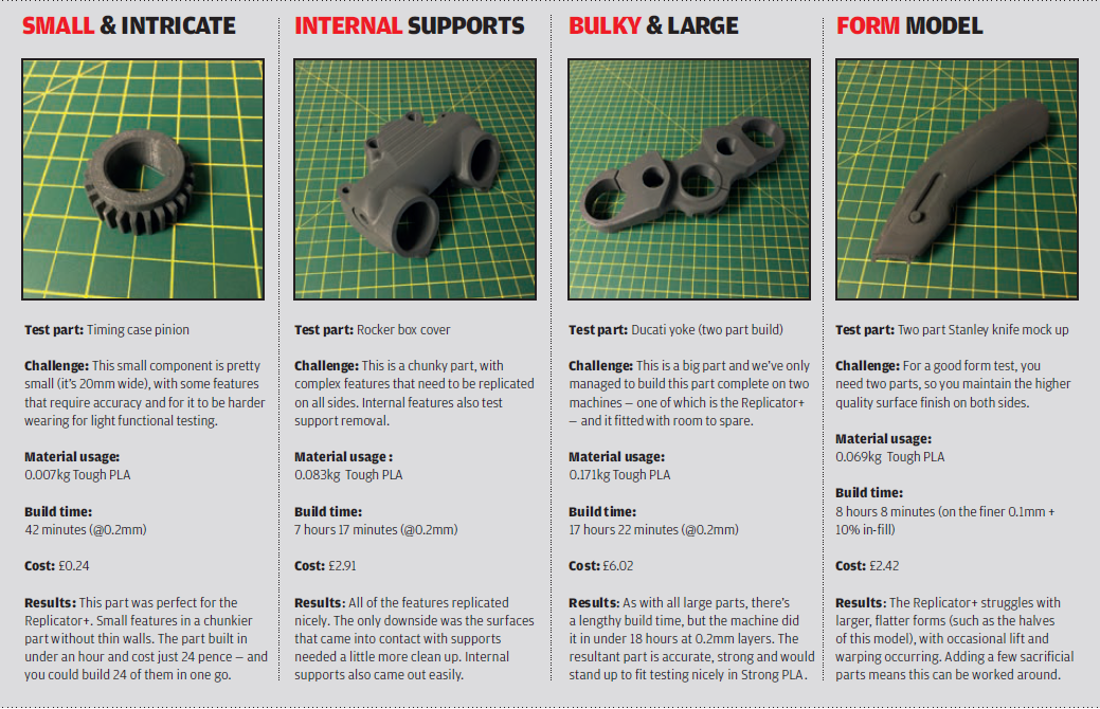
If you try to get down to smaller, thin walled components, such as prototyping sheet metal forms or thin walled injection moulded parts, then you’re not using the best technology. It’ll build them, of course, but they won’t be the best you’d want. However, if you just want a quick sanity check for fit (rather than function) or a form model knocking up, then the machine excels at those too.
If there’s a downside to the machine, it would be the software. Makerbot Print is new and lacks some of the tools you’d expect. There’s no time estimation for a build, unless you actually load it onto the machine (and this is key for making decisions during use). The remote monitoring is excellent, with the app allowing you to not only view progress of a build in numbers, but also visually use the on-board camera. With a few tweaks here and there, it’ll be perfect.
Ultimately, any assessment of a 3D printer comes down to the final resultant models and the costs associated with them. And it’s this combination which gives the Replicator+ a good position in the market.
The machine is low cost, compared to many, particularly considering the build volume (which is one of the largest at this price). The consumables need to be considered also — that’s the filament, the extruders and build sheets — all of which will need replacement at some point, depending on your use patterns.
But even factoring in the consumables and materials, you’re still looking at just over three grand for a year’s worth of workhorse machine. That’s a bargain in anyone’s book.
Tech-specs
» Makerbot Replicator+
» Nylon PLA Filament » 295 x 195 x 165 mm build volume
» 528 x 441 x 410 mm machine dimensions
» 18.3 kg weight
» 0.1 to 0.4 mm layers
» Material spool, extruder & build plate
» USB key, ethernet and Wi-Fi connectivity
» On-board camera & remote monitoring
» 1 year return to base warranty
| Product | Makerbot Replicator+ |
|---|---|
| Company name | Makerbot |
| Price | From £2,199 |