If you’ve been connected to the world of 3D design and engineering software for the last few months, you’ll have heard about Onshape. Founded by most of the same team that started and grew SolidWorks, the company has been gaining headlines and column inches across the globe.

Onshape’s user interface (in the browser) for part and assembly modelling is stripped back, uncomplicated and clearly laid out
That said, in case you’re not aware of what the company is doing, let’s have a quick recap.
Onshape is delivering a free 3D-led design system in the browser. That means there’s little local computation and no install or manual updating of software.
However, it’s worth bearing in mind that Onshape is currently in Beta test. That means it’s not intended for production use although some products are already on the market that have been developed using it. So, the software will change, probably on a monthly if not weekly basis.
Getting up and running
The first step in getting signed up for the system is registering at Onshape.com.
Once complete, the user can simply log-in and get started as long as their web browser is WebGL compliant. For PC, users that’s Chrome and Firefox and for OSX users, that’s Safari, Chrome or Firefox.
Even at this very formative stage, it’s clear that Onshape isn’t like traditional desktop software. There is no download of multi Gb installation files, no trials and no serial numbers.
At its core, Onshape is a history-based parametric modelling system built on the Parasolid kernel and is designed to work predominantly in a multi-body environment.
So, once logged-in, the user is presented with the ‘Documents’ page. It’s worth spending some time here as all work is managed in Documents. (See the list of documents shown in the image below).
Onshape’s Documents windows gives you insight into all of your documents/projects, their status and account management
However, the word Documents is a little misleading. A better way to get your head around it is to think of each as a project because within each ‘Document’, there can be as many data files as needed.
So, alongside the Onshape native Part and Assembly Studio data, the user can also upload all manner of data into Documents, such as requirements spreadsheets, PDFs, MSDSs, third party data etc.
Building your first model
To start modelling, simply create a Document by giving it a name and a description.
As already discussed, Onshape is a multibody parametric modelling system that uses a feature and history approach. This will feel familiar to users of the likes of SolidWorks, Inventor, Catia etc.
The toolbars for Part Studio and Assembly Studio are clean, clear and nicely designed
The difference with Onshape is that all modelling activities, whether it’s the building of a single part or an assembly, are done in a single Part Studio.
All the modelling tools are located across the top of the user interface. There are the usual sketching tools together with features such as extrudes, revolves, sweep (no loft as yet), fillets, chamfers and the like.
There are also patterns and mirroring, Booleans, part splitting, transforming geometry (move, rotate etc.) as well as a couple of direct geometry editing tools for fillets, deleting or replacing faces and offsetting.
The 2D sketch is pretty slick and in line with today’s expectations. Inferred constraints are added on the fly and constraints and dimensions can be added in where needed. Of course, relations between dimensions can also be added in where required.
Whilst modelling, the features and history are added to a sequential list on the left hand side of the screen. This is not just a list of features. Rather it combines a feature list and the history of everything that is done in that Part Studio.
As the system takes a multi-body based approach, different bodies can represent different solid chunks of that model.
Each of the operations allows the user to define whether their current feature is added to existing geometry or whether it’s maintained as a separate body.
To make this more clear, the system automatically colour codes each body. The user can even have a “parts” list below the feature and history to provide even more control.
That said, there are many occasions where separate bodies will be used for a single part. A couple of features, including patterning and mirroring tools, only work at the body rather than the feature level.
To replicate features, the user will need to model them as explicitly separate bodies, create the patterns or mirrors and then either join them together or remove them from the geometry (for patterned pockets, holes etc.) using Boolean operations.
On a side note, Boolean operations now come with an offset option for either all of the faces or a selection. That’s a pretty nice feature for building interfaces between components.
It’s also worth noting that the system has the standard direct editing tools such as move, rotate (done with the transform tool) and deleting of sets of faces, resizing fillets etc.
Because of the multi-body environment, these can be applied to multiple parts at one time. So you can move faces of two parts, or edit fillets on five parts together.
However, using these will also add a ‘feature’ entry to that list but it does mean that they remain a part of the history and are editable.
Any user that’s used a parametric modelling system in the last few years will be able to jump in and get to work almost immediately and I’d encourage you to do just that.
For those that haven’t worked in a multibody way before, the system might take a little while to get your head around, but it’ll click after the first few sessions.
Building assemblies
While the modelling tools are all found in the Part Studio environment, the other ‘modelling’ environment is the Assembly Studio.
It’s here where parts can be inserted (from any of the studios in the current document) and relationships built up between those parts.
When you’re building features, hit the ‘Final’ button. This will show the resultant part as you make design changes — refresh times will depend on the complexity of your history, but it’s useful
Onshape uses a joints based approach, so the preferred method is to define joints on each part, then snap them together using a variety of mates. The current beta release includes fixed mates, rotational, slots, planar, slot or ball mates.
There’s also a more recently introduced selection of mechanism style relations including gears (to define rotational ratios), rack and pinion, screw (which mimics a lead screw) and a linear movement (think: Vice). These allow the user to link up mates to create specific mechanisms between the geometry.
Building up assemblies is pretty slick. The parts or sub assemblies link back to the originating Part Studios, propagating design changes and enabling the user to flex those mates and relations.
Tabs are key
At this point, we’ll look at a key element of the user experience — tabs.
These are found at the bottom of the user interface and provide access to all of the data inside each Document, whether that’s native Onshape Part or Assembly Studios or other data.
As the user’s document gets more data uploaded into it, the strip expands enabling them to scroll across to select the data required. Data can also be accessed from a pop up list (the + symbol).
It’s also worth spending some time looking at the right click menu options on each of these, which provide access to download geometry to carry out translation or conversion.
Tabs will also allow users to copy data from one Document to another. Although it won’t maintain that link, it’s a good way to combine data if needed.
All cloud data storage
Being a cloud-based system, whilst the user is modelling, all their data is being stored on Onshape’s servers.
This means that when viewing, interacting with and editing the model, the user is essentially remotely accessing it through the browser.
There’s no synchronisation with a local copy and no local download and reupload. The data on the screen is the same data stored online.
So should the internet connection drop, although access to Onshape stops the data doesn’t suffer at all. The same is true for a browser crash — something we found happened occasionally, particularly if other tabs are running.
But generally, you get a good response rate. Feature previews are slick and dynamic. Of course, the dynamic nature of those interactions will be controlled by the connection’s bandwidth, but even on a laptop tethered to a 4G network, it’s pretty zippy.
One way to see perfectly how this works is to build an extrude and use the dynamic drag handles to vary the length.
Joints are the order of the day for assembling parts together. These allow you to predefine location and orientation, making assembly easier
Depending on the user’s speed, there will be a momentary wait while the system catches up with the geometry before it displays a preview.
To understand what’s going on here, the in browser tool is used to select geometry and then pulls it out. The system talks to the server and sends back what the geometry will look like. This happens every time the user moves that handle.
In terms of calculation, something that’s not immediately clear is that while the data resides on the cloud and much of the calculation is done on the serverside, there are some functions that are computed locally.
One example is geometry selection. When working with complex (in terms of part count) assemblies, selecting multiple parts using, for instance, a window select, puts a pretty heavy load on workstation resources. The reason is that it uses the local graphics hardware to determine what was in the box selection, which is a computationally expensive process.
For that reason, the specs best performancefor Onshape are both a lot of RAM and decent graphics processing hardware (the latter being key).
Working with imported and 3rd party data
So far we’ve talked about how to build a product model from scratch.
While that’s key, it’s also a fundamental requirement to be able to work with imported geometry — whether that’s data from a customer, a supplier, a previous project or output from a third party system.
As a cloud-based system, anything that needs importing into the system has to be uploaded into the Documents space either within an existing Document or as the basis of a new Document.
Onshape currently works with a number of formats. In terms of neutral or standards based formats, you’ve got Parasolid, IGES and STEP. On the native format front, you’ve got SolidWorks, CATIA, Creo, Inventor and AutoCAD data.
Getting these data types into the system is a little complex as there’s a different approach required depending on whether the user is working with parts or assemblies. For parts, it’s a simple case of importing the part into a Part Studio. For assemblies, it’s more complex.
If you import an IGES or STEP Assembly file into a traditional CAD system you would most likely get an individual file not only for the top level assembly but also for every part and subassembly.
In Onshape, all the parts are imported into one part studio, and tabs are created for each subassembly, and top level assembly. This may be confusing to a new user, because the part studio may appear as a pile of parts laying on top of each other.
Since you currently cannot edit geometry within the assembly tab, making changes to specific parts can be challenging. Onshape is looking to improve this workflow.
Data management with branching and merging
We’ve talked about how to create and edit data so now let’s look at the management of that data. Onshape, due to its very nature, provides version management with the files.
Onshape Assemblies lets you bring together multiple parts and sub assemblies from your Document into a single environment, then use intelligent joints and relations to build up positional and functional requirements
That means that the data on the system is the most up to date (as it’s inherently centralised and single source) along with some versioning tools. This means that the user can formalise the development stages of their product model.
Interestingly, it also features branching and merging capabilities. This is an approach that’s popular in software development circles, but hasn’t really become a part of the design and engineering workflow as yet.
The concept is that a product model can be developed to a point where the user might be faced with two directions of development, each of which they want to explore and progress further.
It’s the type of thing that can be done very easily using paper or manual prototyping processes, but is traditionally very difficult in the digital world.
Using a traditional data management system, this would require a complete new product model and history of development for each — with very little in the way of tools to help rationalise the better parts from each into a single stream again.
Onshape brings branching and merging into the world of 3D CAD for perhaps the first time. The concept is that at any point in the development cycle, the user can choose to create a branch from the current state.

The last two weeks have seen a bunch of new tools added to Onshape, such as offsetting options when creating Boolean operations
This copies the data to a new variant allowing ideas and concepts to be explored. Branches from branches can be created. The image shows how this is done by providing a graphically led idea of what’s going on.
Once the user’s at the point where they want to consolidate these streams, the merge command will bring everything together into a single model again.
Collaboration
Now let’s look at another area that is inherently enabled because of Onshape’s cloud based nature — collaborative working.
In traditional software installs, the process of sharing the resultant data with partners can be problematic. From the most basic of FTP-based file sharing, through dropbox, then into the realms of PDM or PLM linked hosting of data, it can prove tricky to say the least.
Data is out of date almost immediately as you lose control of it once it’s outside your firewall. However, Onshape differs and differs dramatically.
As both the data and the tools to do constructive things with it are cloudbased, if a link is sent to someone, they not only get access to the data along with some nifty viewing tools, but also the editing tools are right there in the browser too.
They don’t have to download, install, or google the use of a viewer for an obscure file format.
The user has control over what folks can do with that data (view only or view and edit). Also, by removing their share privileges access can be revoked.
Alongside the asychronous sharing of data and tools, there’s also a more realtime, immediate collaboration capability built into Onshape. Grab a part, send it to someone and then jump on the phone or skype.
If you’re both running the same part, you can choose to follow one user or the other (by clicking on the icon at the top of the window). That will synchronise the views in terms of rotation, panning, zooming and sectioning etc.
Any modelling will be updated in real time as well. To try this for yourself, just log into the same dataset using two browser windows and see how it works.
Pricing
Now, with a good understanding of Onshape and what it can do, let’s talk turkey. How much does it cost? The answer is that the system is free. That’s right.
There’s no trial or a reduced functionality demo. It’s free, for life.
What you get for that freeness is 5Gb of storage space and five active documents or projects. You can have more than five in your account, you just have to make them inactive. Nothing will happen to this data, you just can’t access it until you activate the document again.
So, where does the payment come into play? The answer is when you want more storage. In other words, more than five documents active at one time. To move up to the paid version or Pro it’s $100 per month, per user. It really is that simple.
Conclusion (a lengthy one)
If I have a criticism of Onshape at present, it doesn’t have anything to do with the technology. It’s too early to start pulling it apart and comparing its capabilities with other systems on the market.
Yes, the system has a small selection of the types of tools that many 3D design and engineers users are used to. And yes, many of these users will quickly find that they’ll try something and support isn’t there yet. But this will come with both time and customer demand.
The Assembly Studio lets you create some pretty complex mechanisms to test out design concepts
That’s the nature of introducing a brand new product into a market that has a wide ranging and experienced community. If you’ve got potential users that are familiar with systems that have decade long development cycles, it’s going to take a while to catch up.
Although I do have some concerns relating to the inter-relation of Part and Assembly Studios and the workflow needs to be straightened out. Those who are used to organising and editing their geometry in the context of multi-level assemblies will also find that difficult, unless they’ve got everything in a Part Studio (the Assembly Studio environment doesn’t give you any editing tools at the moment).
No, my criticism is some of the language that the team is using to describe the various portions of the system.
‘Documents’ aren’t really documents, they’re Projects. Similarly, Part Studios aren’t just about parts, they’re about editing parts and being able to edit multiple parts.
When users are able to get access to the system without much in the way of barriers, this type of issue will reduce some of the effect of that immediate accessibility.
There are a few instances where a simple rethinking of names in line with what designers, engineers and makers might be trying to do, rather than what the technology is doing, might help reduce this.
Ultimately, and as we said at the outset, Onshape is in beta. The development cycle is going to be fast and furious. The good news is that the cloud-based nature of the system means that all users will get access to developments the instant they’re rolled out.
That’s a huge difference compared to the usual bi-monthly or quarterly service pack roll out. It also means that if you have an interest in the system, whether to complement or potentially replace your existing tools, you can’t rely on your first experiences.
It’s worth considering putting a recurring date in your calendar to log-in to Onshape and see how things are progressing, see where functionality has been added, changed and enhanced.
Considering that this is the first month of the open beta, the toolset is impressive and expanding with each release (which seems to be every three weeks). The last update saw the introduction of the assembly relations.
Yes, the modelling tools will need to be fleshed out and there are a few kinks to be worked out with some fundamental parts of the system, but the platform onto which something truly interesting can be built, is there and in place.
Onshape is causing a stir in the 3D CAD and rightly so. There’s much to be very excited about.
At present, it probably won’t suit the majority of our readers, as they tend to be at the upper end of the geometry creation spectrum, but if you’re working on forms that can be modelled with a limited toolset and can live without drawings, then it might just do it.
But let’s be clear here — just because Onshape doesn’t provide those tools now, don’t get fixated on that fact, and keep up to date with its developments.
There’s an incredible team behind the tool, they’re well funded and there’s the potential to build something remarkable here that solves many users’ needs. And at a cost that’s dramatically lower on a monthly basis than almost anything else out there.
Update
To read our 6 month update to this review, click here.
Onshape & mobile: What’s out there & what’s coming?
One of the benefits that Onshape and its browser based way of working is that you can fire up any suitable browser and get to work straight away. And of course, that’s not just restricted to PCs and Macs.
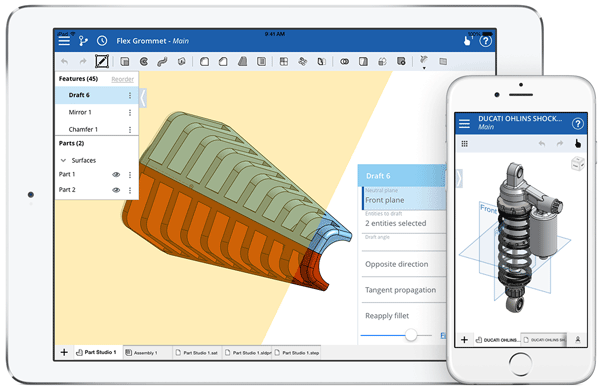
Onshape on the iPad and iPhone is configured for multi-touch
The browsers on mobile devices typically should work as well. But of course, in this day and age, an app(lication) is all the rage, so the team have those in place as well. There’s also the issue that a desktop solution isn’t ideal for a touch and multi-touch focussed device.
At launch, Onshape is looking at Apple iOS devices for its first apps. Whether you’re running it on an iPad or an iPhone, the experience is much the same — a specialised interface (rather than the browser version which isn’t necessarily suited to a multi- touch-based interaction method).
Download it from the Apple Store and log-in. What you’ll get is a version of the Onshape user interface that is suited to the touch based and smaller form factor nature of such devices.
Commands and operations are tucked away when needed (this is particularly key on the iPhone version as screen real estate is limited) but you’ll get to grips with it quickly enough.
Whenever anyone releases a mobile app, particularly in the design and engineering space, you’ll find that the Apple variants come first.
Why is that? Because vendors know that their community favours Apple products — that information is immediately available at the click of a mouse (thank Google Analytics for that). So, it makes sense to get Apple on the street first, then follow up with Android.
Android is coming soon
Onshape have, at the moment, just the apps for iOS devices but we’re told that Android support is coming and, of course, in the meantime it’ll run in the browser anyway.
| Product | Onshape |
|---|---|
| Company name | Onshape |
| Price | Free to $100 per month per user |